Mahanandi

Living in Consciousness ~ Indi(r)a’s Food and Garden Weblog

Janthikalu (Murukulu)

I have seen cookbooks on lentils, rice and on vegetables but never a cookbook dedicated to flours. I am glad that Santhi of Me and My Kitchen, the host of Jihva for Ingredients for August chose a topic covering all types of grain flours to feature for Jihva.

Like Linda, I also had several ideas for JFI, but decided to go with old classic crunchy snack – Janthikalu (murukulu). For us, the best snack foods are made at home, so for our vacation trip last week and to munch during our travel, I had prepared janthikalu (murukulu), using rice flour, gram flour (besan) and moong dal flour. For seasoning I have added salt, chilli powder, cumin, ajwan (carom seeds), sesame seeds and mashed potato. Deep-fried in peanut oil (I find that peanut oil works best for deep-frying and tastes delicious) in batches, janthikalu are our favorite snack item and my entry to JFI~Flour.

Thanks Santhi for hosting JFI and looking forward to reading the recap.

Recipe in detail – Here.


Ingredients for janthikalu and cookie press with different discs to prepare janthikalu


Dough is ready for placing in cookie press and for deep frying


Deep frying janthikalu in peanut oil


Janthikalu – for JFI~Flour

Posted by Indira©Copyrighted in Amma & Authentic Andhra,Gram Flour (Besan),Jihva For Ingredients,Moong Flour,Rice Flour (Tuesday August 1, 2006 at 7:44 pm- permalink)
Comments (25)

The New Home of Mahanandi: www.themahanandi.org

Mirchi Bajji ~ Hyderabadi Style

Some foods I cook for healthy body and some for mental health. Mirchi bajji belongs to later category for me. Cravings and nostalgia motivate me to cook this deliciously hot recipe. Hyderabad, the capital city of my home state Andhra Pradesh has a unique recipe for stuffed bajjis. I have already blogged about mirchi bajjis with different stuffing’s from different regions in India but thought this famous Hyderabadi style mirchi bajji deserves one more post dedicated to it.

Chilli bajjis, the popular street food are incredibly easy to prepare at home and make an excellent way to begin almost any special meal or they can be served as a light meal/snack on busy days. Because we remove the middle thick white vein that carries the seeds, these chilli bajjis are surprisingly mild and not that hot at all.


Reducing the spice kick of chillies by removing the white vein with seeds.

Recipe:
(for 20 chillies)

Preparing the filling to stuff the chillies:
Sesame seeds – 3 tablespoons
Dried coconut powder – 3 tablespoons
Coriander seeds (dhania) – 1 teaspoon (dry roast these 3 to pale gold color)
Salt – ¼ teaspoon
Tamarind juice – 1 tablespoon
Take them all in a blender or spice mill – make a smooth paste without adding water. Remove to a cup.

Mirchi (Chillies) Preparation:
Pick 20 straight, plump, healthy looking chillies. Wash and dry them in a kitchen towel. With a sharp knife make a vertical slit in the middle of chilli on one side. Keep the ends intact (see the photo above). Insert the knife tip and pluck the thick white vein in the middle along with the seeds. Usually it will come off nicely with a sharp knife. After preparing all chillies in this way, start stuffing. Fill the gap with the sesame filling nice and evenly one by one and keep them aside on a plate.

Preparing the batter to dip stuffed chillies:
Besan (gram flour) – 2 cups, sieved
Rice flour – ¼ cup, sieved
Salt, cumin and ajwan (vaamu) – ½ tsp each
Take them all in a vessel, mix to combine. Adding water, prepare medium thick batter of thick buttermilk consistency.

Deep-frying:
Take about 3 to 4 cups of peanut oil in a deep bottomed skillet or kadai. Heat the oil on medium-high. One by one dip the bajjis in batter and gently drop from the sides of kadai into hot oil and deep fry until golden. Remove to a paper towel covered plate and let cool a minute or two. Serve with some limejuice sprinkled and finely sliced onions and tomatoes on the side.
(I’ve dipped the bajjis in batter again and double fried them for that true taste.)


Mirchi Bajjis with Chickpea Guggullu and Watermelon Granita (Ice) with Cherries
Our Comforting Meal and My Entries to
Santhi’s JFI~Flour and also to Revathi’s FMR~Comfort Foods

Watermelon Granita with Cherries
Watermelon juice, limejuice mixed and frozen for about 4 hours. The ice is crushed (gently with a hammer) and cut cherries are added before serving

Posted by Indira©Copyrighted in Amma & Authentic Andhra,Cherries,Flour(Pindi),Gram Flour (Besan),Green Chillies,Jihva For Ingredients,Peppers,Rice Flour (Monday July 31, 2006 at 3:18 pm- permalink)
Comments (46)

The New Home of Mahanandi: www.themahanandi.org

Peach Pie

I am not an American still I like pies! Apple, peach pies and from my Houston days the pecan pie of Texas, are my favorites. One of the new recipes that I tried for my friends visit last weekend was baking a lattice topped peach pie. Lattice topped pies are the prettiest pies of all I think. They look so delicate and so delectable, you just want to rip off the lattice top and devour.

Though the traditional American pie is made with enough butter that a ordinary Indian would eat in a year, I designed my pie keeping health in mind – reduced the butter quantity in pie shell drastically, still it came out great. The base was like thin crust pizza pie base, and the peach fruit topping – I read that peaches are the kind of fruits that would come alive with touch of heat. I picked peach filling mainly for that reason and I agree, they tasted great after baking. And the lattice top – it was fun to weave the top.

Both Vijay and I, we are the offspring of silk and cotton weavers, so it didn’t take long for us to figure out how to weave the dough strips, and also Barbara’s post helped me a lot. Thanks Barbara. All and all, even with shortcuts, the pie came out good, I imagine just like a traditional rural pie would; firm-flaky crust that tasted little more than browned butter and flour and a peach filling that was naturally sweet and juicy. A blue ribbon winner for sure.:) If you are interested to try this recipe, please keep in mind that peach pie is little bit acquired taste, also depends entirely on the quality/ripeness of peaches.

Recipe:
(for 9-inch pie pan)

Prepare the dough:
2 cups of all-purpose flour (sifted),
Quarter cup of cold, solid butter finely chopped and
1 tablespoon of sugar and 1 teaspoon of salt –
Take them in a vessel. Mix (rub) the flour with butter pieces and adding few drops of cold water inbetween – prepare a tight dough. Cover the dough and keep it in the refrigerator for at least 30 minutes. Meanwhile prepare the fruit filling.

Fruit filling:
6 to 8 ripe peaches – peel, cut and remove the seed. Slice the fruit into thin pieces lengthwise
Quarter cup of sugar
2 tablespoons of corn starch (added to absorb the fruit juices and to prevent saggy base)
1 teaspoon of limejuice
Take sliced peaches in a vessel; add sugar, cornstarch and limejuice, toss to mix. (Because this fruit mix could ooze lot of juice with time, mixing with sugar etc., do it just after you roll out the pie shell.)

Rolling out the dough:
Remove the pie dough from the refrigerator. Divide it into two portions, ¾ and ¼ part, the big one for pie shell and the small part for lattice top. Roll the big portion of dough into a big round that would fit the pie pan. Lift and place neatly into the pie pan.
With the remaining small portion of dough – roll it into another big round. Cut the dough into thin strips lengthwise with a sharp knife. Make a lattice weave following the instructions here. (Do you remember how folks back home weave cotton rope layers for sleeping cot? Same thing here, quite easy.) I did it on the back of wax paper covered steel plate; it was easy to place the lattice top on the pie.

Assembling and baking:
Fill the pie shell with fruit slices neatly in a level, to the top. Carefully place the lattice weaved dough strips onto the fruit pie. Brush the top with milk and sprinkle some sugar on top.
Preheat the oven to 400 F. Place the pie pan on a flat big baking sheet and bake at 400F for about 20 minutes and then at 350F, for about 30 minutes, until the top turns to golden brown and fruit inside becomes soft and juicy. Do not underbake.
Remove and cool. Slice and serve.


Lattice Topped Peach Pie – Ready For Baking


Baked Pie Removed to a Plate to Cool


Peach Pie


Traditional American apple pie – Recipe in images.
How to weave lattice top for pies – Barbara’s post here.

Posted by Indira©Copyrighted in All-Purpose Flour(Maida),Fruits,Peaches,Sugar (Wednesday July 12, 2006 at 1:39 pm- permalink)
Comments (26)

The New Home of Mahanandi: www.themahanandi.org

Gram Flour Dosa (Besan Ka Cheela or Puda)

I like food items prepared with gram flour. Golden yellow colored flour not only tastes mildly sweet, it’s also gluten free and famously known for its anti-diabetic properties.

Other Bharatiya names for gram flour are – Besan (in Hindi), Sanaga Pindi (in Telugu) and Kadalai Maavu (in Tamil).

After bajjis and pakoras, my next favorite item with besan is dosas. Besan Dosa is a traditional Indian breakfast and evening snack item, prepared by mixing gram flour with a variety of finely chopped vegetables. The dosas are usually served with chutney and raita. They are quite easy to prepare and we can experiment with ingredient quantities quite liberally without any dire consequences.

Recipe:
For about 8 to 10 small size dosas

2 cups of gram flour (besan)
1 big onion, 6 green chillies, few sprigs of cilantro – finely chopped
1 big carrot – finely grated
1 tsp of each – cumin and ajwan (vaamu/carom seeds)
½ tsp of salt or to taste

Sift gram flour to aerate and to remove lumps. Take in a big vessel. First add cumin, ajwan, and salt. Mix to combine. Next, add the finely chopped vegetables. By gradually adding water, about 1 to 2 cups, mix and prepare besan batter to a medium-thick pouring consistency, like idly batter.

Heat an iron dosa pan and grease it with half-cut whole onion. When the pan is hot, pour ladleful of batter and spread into thin round. Sprinkle half teaspoon of oil or ghee on the top. Wait for bubbles to appear. When the underside starts to brown, gently lift and turn to other side. Cook the dosa until the second side is lightly browned. Remove and serve hot with chutney. (They are not that good when they get cold, so prepare them just before mealtime.)

Besan Dosa with Red Bell Pepper Chutney
Besan Dosas, Red Bell Pepper Chutney with Coriander Flower Garnish ~ Our Simple Lunch Today

More About Besan Dosa:
Video blogging of Puda by Jay Dave and Sisters (entertaining)
Kay’s Besan Cheela
Italian Version-Socca from Tasty Bytes

Posted by Indira©Copyrighted in Gram Flour (Besan) (Monday June 19, 2006 at 3:32 pm- permalink)
Comments (29)

The New Home of Mahanandi: www.themahanandi.org

Gram Flour (Besan, Sanaga Pindi)

Besan, Gram Flour, Sanaga Pindi, Chana Dal Flour
Gram Flour (Besan, Sanaga Pindi) ~ For This Week’s Indian Kitchen

Gram Flour : Recipes

Posted by Indira©Copyrighted in Gram Flour (Besan),Indian Ingredients,Indian Kitchen (Sunday June 18, 2006 at 6:03 pm- permalink)
Comments (2)

The New Home of Mahanandi: www.themahanandi.org

Punjabi Naan


Naan with walnut-raisin toppings

Hot and fresh from tandoori oven, light and chewy, Naans epitomize everything that is good about wheat flour. But preparing naans at home means inviting disappointment most of the times. Recreating the tandoori magic in a home style-baking oven is impossible and invariable comparison to the Indian restaurant tandoori baked ones will lead to frustration.

But sometimes, mainly because we don’t have an Indian restaurant in this town, I’d prepare them at home following a traditional Punjabi recipe. (This recipe is again from our kind neighbor, an old acquaintance Deviji.) The dough is prepared with milk or yogurt. I usually go with fresh homemade yogurt, for naans with little bit of sour note.

I can’t say the end result is excellent; of course the culprit is the baking method, not at all the recipe fault. What I can say and recommend is they are worth the effort, good in taste department, and come close to the original in texture and softness. So give it a try. But please don’t expect the tandoori magic.

Naans all ready to go into oven
Naans all ready for baking

Recipe:
(For 8 to 10 naans)

4 cups of fresh all-purpose flour
1 to 2 cups of yogurt
(I usually use home made yogurt. Fresh yogurt gives a unique taste to naan. If you are not sure of quality of yogurt, go with milk)
2 tablespoon of melted ghee at room temperature
1 tablespoon of sugar
1 teaspoon of salt
Yeast mixture:
In a small cup, take 2 tablespoons of warm water add pinch of sugar
Stir in 2 teaspoons active dry yeast
Mix and wait for it to rise.
To top:
I went with walnuts and raisins this time.
(Cumin, Sesame seeds, Minced onion, garlic, they all work too.)

Baked Naans
Oven Baked Naans

1. In a large bowl, sift flour, stir in salt, sugar and ghee. Add the yeast water. Mix by gradually adding the yogurt. Add and mix until the dough starts to leave the sides of the bowl and comes together in solid lump.

2. Transfer the dough to a lightly greased surface, oil your hands and knead it for 5 minutes. Keep it covered overnight or for at least two hours. (I usually leave the dough covered for overnight.)

3. When you are ready to bake, take the dough out, knead for another 5 minutes. Divide the dough into lemon sized rounds. On a board or countertop, dust a little bit of flour, and roll out each ball into a big round with 1/4 to 1/2 inch thickness.

4. Prepare all the rounds like this and neatly place them on a greased or parchment paper lined baking tray for baking. Brush them all lightly with melted ghee. Sprinkle and press toppings (walnuts).

5. Preheat the oven to 425 F. When oven is ready, place and bake for about 5 to 10 minutes. White dough changes in color from light cream to pale pinkish red like baby’s cheeks. Keep an eye on oven and take care not to brown/over bake. Remove and serve hot with a curry.

Naan and Turnip Kurma
Naan and Masala Turnips (Shalgam)

Flour choice: King Arthur Unbleached All-Purpose Flour
History of Naan : Link
More Naan Recipes: Sugar and Spice, Gattina, Egullet

Posted by Indira©Copyrighted in All-Purpose Flour(Maida) (Tuesday June 6, 2006 at 3:05 pm- permalink)
Comments (28)

The New Home of Mahanandi: www.themahanandi.org

Strawberry~Mango Scones

Strawberries

Strawberry mango scones are crisp outside and crumbly and soft inside. What makes them stand out is the flavor combination of sweet and tart in the same bite. This dessert is delicious, attractive and easy to prepare. Don’t fear the fancy title, scones are nothing but freeform style baked cakes.

Recipe:

All purpose flour : 2 cups
Sugar : 4 tablespoons
Salt : ½ teaspoon
Baking powder : 2 teaspoons
Baking soda : ¼ teaspoon
Cold and solid butter : 3 tablespoons, finely chopped
Wet Ingredients
Firm and fresh Strawberries : 1 cup, chopped
Dried mango : ¼ cup finely sliced
Yogurt : ½ to 1 cup of fresh yogurt
Lemon glaze
Lime juice – ¼ cup and sugar- 2 tablespoons. Bring them to a boil in a small saucepan and let the juice thicken a bit – lemon glaze is ready. (Prepare this while baking the scones.)

In a mixing bowl, sieve together the flour, baking powder and soda. Stir in sugar and salt. Add and mix the finely chopped butter until mixture resembles breadcrumbs.

To this flour mixture, add strawberries and dried mango pieces. Add the yogurt gradually and mix to form tight, sticky dough. Gently knead the dough for 2 minutes, take care not to break and bleed the strawberries.

Turn the dough out onto a floured or parchment covered baking sheet and press out into a big round with a thickness of half to one inch. (This is the messy and sticky part. Apply oil or ghee to the rolling pin or use flour to prevent dough from sticking. )

Preheat the oven to 425?F. When the oven is ready, place the baking sheet and bake. The dough will puff up and increase in volume. Bake until golden brown, for about 15 to 20 minutes. Remove and drizzle the lemon glaze on top. Let it cool a bit, and slice into 6 to 8 triangle slices. Serve warm and enjoy.

Ready for baking - Strawberry Mango Scones
Dough ready for baking

Strawberry and Mango Scones with Lemon Glaze
Golden and Glazed

Strawberry- Mango Scone with Lemon Glaze
Berry Good Treat ~ Strawberry Mango Scones
For JFI-Strawberries Event, Hosted by Pastry Chef and Baker, the lovely Baking Fairy

Recipe Adapted from Foodblog – “Delicious!Delicious!”
Dried mango Source: Indian grocery shops.
Flour Choice: King Arthur brand All Purpose Flour

Posted by Indira©Copyrighted in All-Purpose Flour(Maida),Mango,Strawberries (Thursday June 1, 2006 at 2:03 pm- permalink)
Comments (35)

The New Home of Mahanandi: www.themahanandi.org

Pancake Ponganalu with Mango Sauce (Ebleskivers, Danish Pancakes)

Ponganala Pancakes (Ebleskivers)

Pancake ponganalu or Ebleskivers is one of the recipes that I prepared last weekend for JFI-Mango event. By the way, event hosting is a very time consuming thing one can do, I can tell you that. I have more respect for the bloggers who host this type of events month after month. They must really love doing this.

How did you do it Indira? Enquired few future hosts of JFI. The way I did it was gathering all entries in one place, arranging them in neat piles and then did the write-up. Adobe photoshop/picasa(free) helped a lot with image resizing. Instead of following the traditional roundup style filled with adjectives and superlatives, I chose a different, practical approach for my recap. Also in a proper Indian way, I returned the courtesy by thanking all my participants individually. If you ever plan to host or have already committed to host this kind of event, expect to dedicate one full day to do the roundup. Of course, it all depends on the number of responses the event generates; still it takes minimum one day. So, plan ahead my peeps. 🙂

Few weeks ago, when I posted ponganalu– a unique south Indian breakfast preparation, the post generated interesting comments with links to almost similar type of Danish breakfast preparation called danish pancakes or Ebleskivers. In Danish version, they mix the pancake flour with eggs and milk and prepare the rounds and serve them with fruit jam or sauce. I am a big fan of fluffy pancakes so thought to try this version; also I already have the well-seasoned special type of iron skillet that’s needed to prepare them.

Recipe is simple to follow. Mix pancake flour with milk and I went with mashed ripe banana instead of eggs. Prepare the Danish pancakes, ponganalu style and serve them with homemade or storebought type of mango sauce. Delicious! They were like fluffy round pillows; delicate crust outside and insides are like biting into a warm cloud. You want to float forever in these clouds. I loved and had them dunked in Nirav mango pulp/sauce whereas Vijay went with the classic, the maple syrup. Anyway you prefer they are worth a try.

Pancake Ponganalu (Danish Pancakes) With Mango Sauce
Pancake Ponganalu (Ebleskivers, Danish Pancakes) With Mango Sauce

Recipe:
1 cup of pancake flour (I used Aunt Jemima brand mix)
Peeled and smoothly mashed, half banana
1 to 1½ cups of milk
Ponganala Skillet and
Mango Sauce
Take the flour, milk and mashed banana in a vessel, whisk them thoroughly without any lumps. Consistency of batter must be like condensed milk (store bought), little bit tighter than the batter for regular pancakes. Heat a ‘ponganala‘ skillet and follow the photo-steps outlined here in my previous post about “ponganalu. Serve them hot with mango sauce.

Posted by Indira©Copyrighted in All-Purpose Flour(Maida),Bananas,Mango,Milk (Thursday May 4, 2006 at 12:23 pm- permalink)
Comments (20)

The New Home of Mahanandi: www.themahanandi.org

Wheat Flour Dosa (Godhuma Dosa)

Goduma Dosa with Peanut Chutney
Wheat flour dosa (Godhuma Dosa) with Peanut Chutney

Easy, breezy and lacy – that’s how I’d describe wheat flour dosa. I prepare this traditional, lace like, instant dosa when I am low in appetite, ya that happens sometimes, or short on time, aren’t we always?

Recipe is really simple. Mix a cup of wheat flour (atta/chapati flour) with 2 to 3 cups of water. Stir in a teaspoon of black pepper powder and salt. Thoroughly mix the batter without any lumps. The consistency of batter must be like thick buttermilk, not too watery or not too tight. Don’t let the batter sit for long time, it will become gooey mass, and resulting dosas won’t be pretty.

To prepare dosas, lightly oil the dosa tava and rub it with a cut onion. Heat over medium-high. When the tava is hot, pour a ladleful of batter steadily from a height of 3 to 5 inches onto the tava. Allow it spread on its own in a thin lace like layer. Because wheat flour batter is very sticky, trying to shape the dosa with back of the spoon like we do for regular dosa won’t work. Please resist the temptation to shape and allow it to spread on its own. Sprinkle a half teaspoon of ghee or peanut oil and on high heat, cook. Within a minute or two, bubbles start to appear on the surface. Wait until the underside of dosa turns golden and then gently turn it to the other side. Cook for another minute or two. Remove and serve hot with peanut or coconut chutney.

Wheat flour batter spead thin in a lace like fashion on hot tava. Bubbles are appearing.
Wheat flour batter spread in a thin lace like fashion

 Turning to the other side to cook

Folding it into half to remove the dosa
With 4 plate-sized dosas like these, expect to get stuffed royally.

Posted by Indira©Copyrighted in Amma & Authentic Andhra,Wheat Flour (Durum Atta) (Tuesday April 18, 2006 at 3:24 pm- permalink)
Comments (44)

The New Home of Mahanandi: www.themahanandi.org

Sesame Buns

Yay… spring has definitely sprung here! Plenty of sunshine days have arrived finally. Even the yeast is ready for some action. When I mixed a packet of yeast with warm water, zoom… it rose to the sky as if it was trying to kiss the sunshine. See.

Yeast in action
Yeast in Action

Recipes that need good fermentation like preparing bread, idlies, dosas and yogurt, are going to be easy from now on. Last weekend, I tried a recipe for sesame buns from my recipe book. I used to note down the western bread and cake recipes that caught my fancy in a notebook. That was before I knew about the foodblogs. I wasn’t even aware of copyrights etc., at that time, so I’m not sure where I got this recipe from, but definitely from a cookbook, or might be from TV. I am not sure. Whatever the origin, I am very fond of this recipe. Adding a bundle of sesame, gives the bread that nutty taste I like and the buns are great with soups, salads or for homemade simple sandwiches.

Recipe:
(Makes about 8 to 10 medium sized buns)

3 cups whole-wheat flour
1 cup sesame seeds
1 cup quick oats
½ cup watermelon seeds (My addition)
1 tsp of salt and honey to your taste or ½ cup
Warm milk or water for mixing the dough into a ball
Yeast:
¼ ounce packet of active, dry ‘quick rise’ yeast or 2 tsp
Take 2 tablespoons of water in a cup, stir in a pinch of sugar. Pour the contents of yeast packet and stir. Keep it in a warm place and wait for it to turn bubbly, usually 5 to 10 minutes.

The dough at '0' hour The dough after one hour

The dough is shaped into buns is ready to go into the oven

Method: Take all the above ingredients in a big bowl and mix them thoroughly. Knead the dough for at least 5 to 10 minutes. Cover and let it rise. Takes about at least one hour. I’ve kept it for about 3 hours.

Take the dough out and on a clean board, sprinkle in some flour, and deflate and knead the dough again. Do it for at least 2 to 5 minutes. Divide the dough into small balls, shape them into buns. Place them on a greased baking pan; leave space for them to expand. Wait for another 30 minutes for them to rise.

While the shaped buns are rising, preheat the oven to 350 F. Place the baking pans with buns in the oven and bake at 350 F for about 30 minutes or until golden brown. Remove and let cool.

Sesame Bun Sandwich
Sesame bun and dried soya chunks-eggs omelet sandwich.

Posted by Indira©Copyrighted in Sesame Seeds,Whole Wheat Flour (Monday April 17, 2006 at 9:34 am- permalink)
Comments (26)

The New Home of Mahanandi: www.themahanandi.org

Sorghum Roti (Jonna Rotte, Jowar Roti)

 Jonna rotte with curry (Sorghum roti with curry)

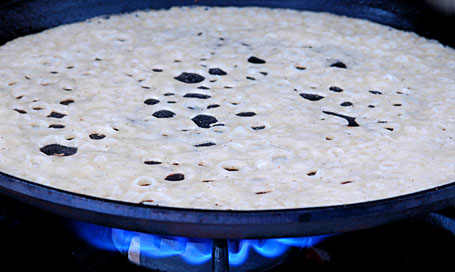
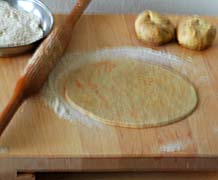
Very popular in villages and small towns as an accompaniment to meat and vegetable gravy curries, sorghum roti is one of the traditional recipes of India. As the name suggests, the rotis are prepared from sorghum flour. Instead of rolling pin, hands are used to shape the sorghum dough into a round, flat, thin circle. Because sorghum flour is gluten-free flour, it’s very tough to spread the dough without breaking the shape, and one really needs hands-on experience and many failed attempts to get the skill.

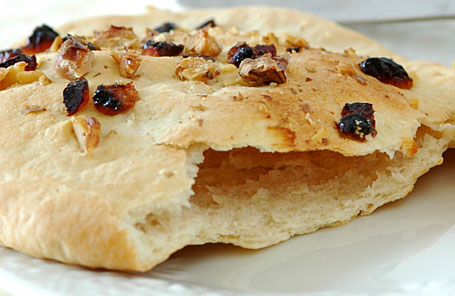
I am very sad to say that it is becoming one of those ‘dying’ kind of recipes. My mother and grandmother generations perfected the sorghum roti preparation. But coming to my generation, the ‘educated’, the ‘sophisticated’ ones, who can talk about baguettes and brie’s for hours and goes to great lengths to prepare and showoff knowledge of foreign cuisines, have no interest and can’t give the time of the day to learn or master the technique of this classic Indian recipe. It is not that we don’t like the taste. We love it! Imagine the warm paratha taste, multiply by 10 times, that’s how a good, well made sorghum roti tastes. In artisan hands, it puffs like puri – all on its own. No leavening agents and oil or ghee are added. Just fresh sorghum flour, warm water and touch of fire – pure grain power in its glory.

Making a prefect sorghum roti is a skill that I wanted to master with all my heart. For me, it is not just a recipe, but an Indian tradition that I wished to be a part of. The process is difficult to explain in written words and pretty much useless. Again this is one of those recipes, where one must be in the kitchen next to the cook, to know what they are talking about. One really needs a visual experience to understand the recipe. Well that’s how I feel anyway, so I’m going to keep the recipe directions simple for a change, and instead show the process in images.

Spreading the dough into thin round shape using hands

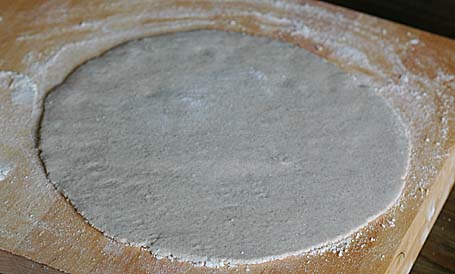
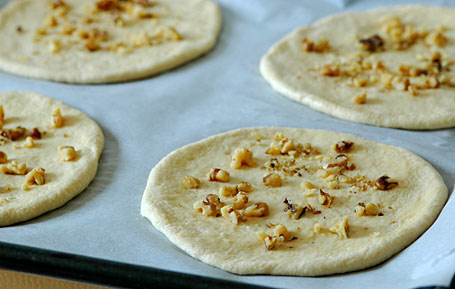
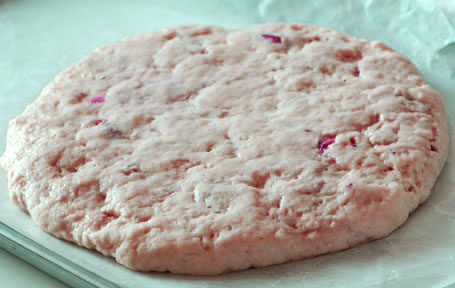
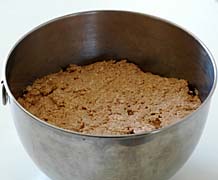
Prepare dough by gradually adding and mixing hot water. After a rest period of 10 to 15 minutes, the dough is kneaded and divided into lemon sized balls. Then, using palm of the right hand, on a flat board, the dough is spread into flat, thin round.

Cooking the roti

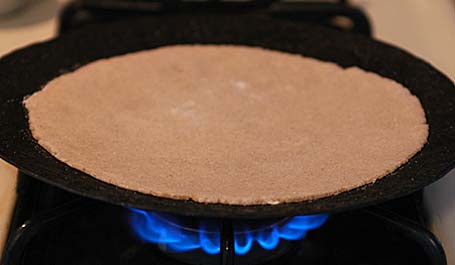
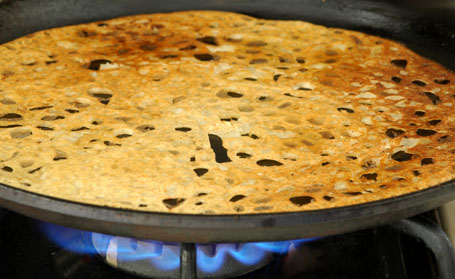
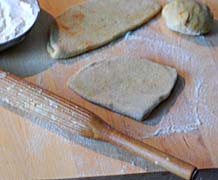
The doughspread is carefully lifted and placed on a hot iron 
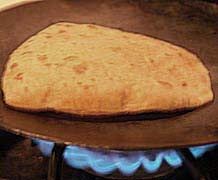
tava (griddle). We use a separate tava just for making these rotis. On medium-high heat, roti is roasted slowly. Water is applied with a cotton cloth on the surface of roti, before turning it to the other side.

Roti is turned to otherside

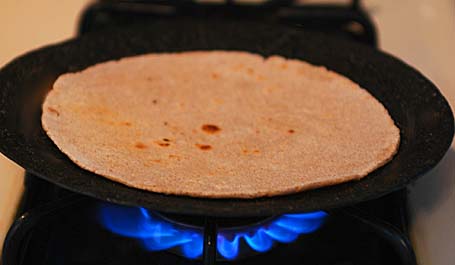
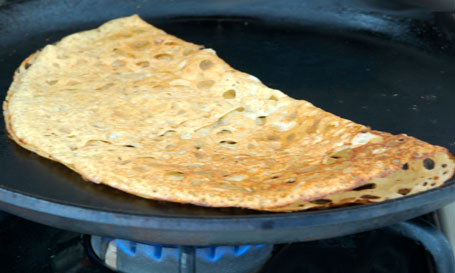
After two to three minutes of cooking, roti is turned to the other side and cooked until done.


Sorghum roti (Jonna Rotte, Jowar roti) with curry
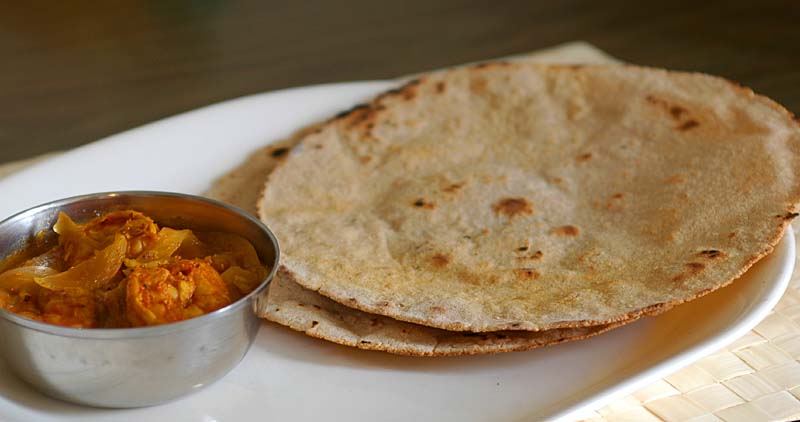
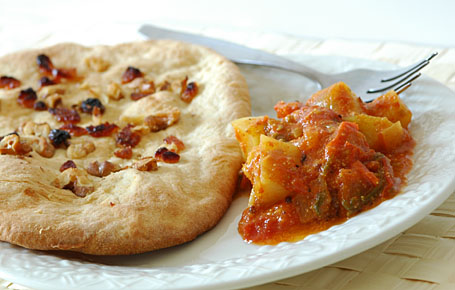
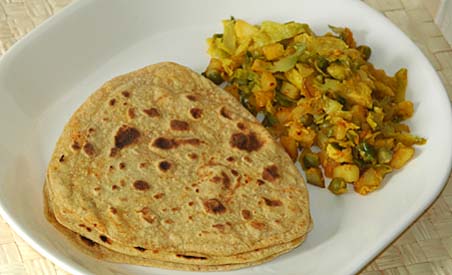
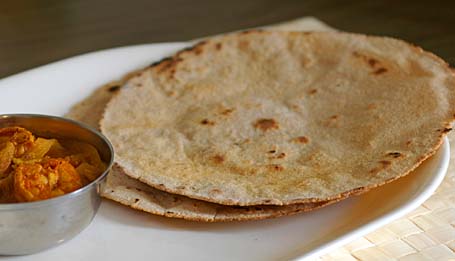
Jonna Rotte (Sorghum Roti) with curry ~ our meal today.

Recipe origin and source: Rayalaseema(Andhra, India) and Amma.

Posted by Indira©Copyrighted in Amma & Authentic Andhra,Bajri/Jowar Flour,Jowar (Jonnalu),Millet (Tuesday April 4, 2006 at 10:49 pm- permalink)
Comments (72)

The New Home of Mahanandi: www.themahanandi.org

Cornmeal-Cabbage Muffins

Williams-Sonoma, the kitchenware shop that sells quality kitchen stuff, has a series of cook books – Like their shop, the cookbooks are very clean, organized, not a lot of recipes, but have an excellent presentation and gorgeous photos. The book size is not too big, not too small; they are like short notebooks with color photo on every page. Each book focuses on one topic. So far, Cookies, Cakes, Muffins, Breads and Risotto – these are the cookbooks, I borrowed from my local library and flicked through. More than anything, they are eye candy.

Williams-Sonoma

Stephanie of Dispensing Happiness, my blog friend is blogging recipes from ‘Muffins‘ cookbook. When she mentioned last week that she was going to try cornmeal-jalapeno muffin recipe, I wanted to join in and made a baking date with her. After two renewals and before returning the book to the library, I wanted to try at least one recipe. FInally last weekend, I baked cornmeal muffins from the book.

I followed the recipe mostly and also added some extras, because I was preparing these muffins for our supper. In addition to corn meal, all purpose flour, butter milk and baking powder etc, I have also added cabbage, shallot, chickpeas sauté to the cornmeal dough, so that the muffins baked would be more dinner worthy. They turned out, I can’t say excellent, but acceptable, even after all these extras. I can’t imagine the taste if I tried them bland with only just cornmeal and chillies.

cornmeal-cabbage dough in muffin pan - all ready for baking

Recipe:
(For 11 muffins)

1½ cups of yellow cornmeal
1 cup all purpose flour (maida)
1½ cups of buttermilk
1 tablespoon peanut oil
1 teaspoon of each – salt, sugar and baking powder
Some cheese gratings to top the muffins
Veggies I added
3 cups of finely chopped cabbage (I used red cabbage)
3 shallots and 6 green chillies- finely chopped
½ cup of chickpeas (soaked overnight)

First I sautéed the veggies together for few minutes, until they are cooked. In the meantime, I mixed all other ingredients together thoroughly without any lumps. I stirred in the sautéed veggie mixture to the dough. Greased the muffin pan with little bit of oil, leaving one muffin cup empty and filling it with water to prevent warping (following the book suggestion). Filled the muffin cups with cornmeal-cabbage dough. I also sprinkled cheese on top of some. Baked them in a preheated oven at 400 F (200C) for about 25 minutes, until they are golden.

They tasted like baked versions of cabbage bajjis (you know the kind, bajjis/pakoras – veggies mixed in a gram flour-jowar flour-rice flour dough, then deep fried — almost like that).

Cornmeal Cabbage Muffins - One with cheese sprinkled on top and the other with no cheese topping
Cornmeal-Cabbage Muffins

Recipe Source: Adapted from ‘Williams Sonoma-Muffins’, page 46
Things I skipped adding (from the book’s recipe) are 2 eggs, another 1 ½ tsp of baking powder and more oil – reason for my flat muffin tops.

On a blogging break. See you all in a few days.

Posted by Indira©Copyrighted in All-Purpose Flour(Maida),Cabbage,Chickpeas,Corn Meal,Shallots (Tuesday February 28, 2006 at 2:07 pm- permalink)
Comments (34)

The New Home of Mahanandi: www.themahanandi.org

Upma with Hominy Grits

I got hooked on grits, a type of coarse meal, and product of stone grind, dried corn. In looks, grits are similar to rice ravva (the kind we use for rice upma), coarse sand like and grainy. The texture, smell and taste of grits is really something and quite addictive. Do you know the taste of dried corn kernels (before popcorn), grits taste almost like that.

I keep the preparation of this particular upma very simple; don’t like to add lots of vegetables, like I do for couscous/cracked wheat. Just the basic upma ingredients and some roasted nuts-either cashews or peanuts, that’s about it. Just enough for my Wednesday’s yogi (minimal) diet.

Grits, red onion, ginger, green chillies, curry leaves, ghee in the cup--- cumin and mustard seeds, urad dal, chana dal --- ingredients for grits upma

Recipe:

2 cups of grits (I used Quick Cooking Grits)
4 cups of water
1 onion, 2 green chillies & a small piece of ginger – all finely chopped
Salt to taste
A fistful of roasted cashews or peanuts

For popu or tadka
1 tablespoon of ghee
1 tsp each-mustard seeds, cumin, urad dal, chana dal & curry leaves

In a large pan, heat ghee. First add and sauté popu/tadka ingredients, then the finely chopped onion, green chillies and ginger. When they are golden, add water and stir in the salt. Cover and bring to a boil. Remove the cover, slowly add hominy grits, stirring continuously. Reduce heat, cover and cook for 15 minutes longer, stirring occasionally to keep from sticking. Serve hot with chutney.

Hominy Grits upma with Amla chutney
Hominy Grits Upma with Amla chutney ~ My Wednesday’s Yogi Diet

Posted by Indira©Copyrighted in Corn - Hominy Grits (Wednesday February 1, 2006 at 2:51 pm- permalink)
Comments (12)

The New Home of Mahanandi: www.themahanandi.org

Avocado Chapatis

Why didn’t I think of this idea before? That is what I thought, when I read the post “Avocado Parathas” by GM of ‘The spice is right’ food blog.

I know that avocado is nature’s ghee/butter. And just like them, ripe avocado is full of fat and has no significant taste to speak of. Avocado’s mashed pulp easily mixes with all kinds of ingredients and helps to make their flavors stand out. I had to give it a try.

Yesterday, I tried the recipe. The result – very smooth, tasty chapatis, the kind we know from India and dream of making it here in US. Smooth, silky flesh of ripe avocados when mixed with chapati flour, magic happened. All the fat in avocado made the flour softer, very pliable, easy to handle and chapatis off the griddle (tava), remained soft even after 6 hours. In this cold, winter weather, that’s a miracle, if you ask me.

Ripe Avocado and Wheat flour with red chilli-garlic powder and salt

Recipe:
for 10 to 12 chapatis

2 cups of durum wheat flour
(I used Golden Temple brand wheat flour, available in Indian grocery shops)
1 very ripe avocado (more about avocado-here)
1/2 tsp of salt
1/2 cup of warm water
I also added 1/4 tsp of red chilli-garlic powder for a little bit of hotness

 Chapati Dough made with wheat flour and avocado paste  Rolling out chapati in round shape

Preparation:

Avocado: Take a ripe avocado; cut it into half, going around the pit (seed) in the middle. Twist and separate two halves. Stab the knife into the pit; pull it out, the pit will come out easily. Scoop the flesh of avocado using a spoon, from each half. Take it into a small cup; mash it to a smooth paste, using your fingers or with a spoon.

Flour: Take flour in a big vessel. Sprinkle in salt and red chilli-garlic powder, and mix the flour. Then add the avocado paste to the flour and mix thoroughly. Now gradually adding water, make firm dough. Make sure that dough is not too soft or too hard. Knead the dough for two minutes. Cover and set it aside to rest for about 15 to 30 minutes. In the meantime, prepare a curry for avocado chapatis. I made Brussels sprouts-potato curry.

 Shaping the chapati in triangle shape  Cooking chapati on hot iron tava

Rolling out Chapatis:
Knead and rollout the dough into a cylindrical long roll on a wood board. Take small lime sized portions and using hands, shape each into a smooth ball shape.
Take the dough ball on a clean wood board, sprinkle some flour on it and around. Using a rolling pin, press/roll out the dough into a big thin round. You can fry it on a hot griddle or to get more flaky layers, what I usually do is, fold the rolled out round twice, to get a triangle shape (see the photo above) then roll into a big, thin triangle.

Cooking chapatis:
Heat a cast-iron griddle/tava, when it is hot, place the chapati and cook it on each side until golden. While the chapati is cooking on hot tava, I roll out another chapati for frying. I usually make 6 chapatis for the two of us for a meal, takes about 15 to 20 minutes maximum.

Serve hot with curry or dal.

Avocado Chapatis with Brussel Sprouts Curry
Avocado Chapatis with Brussels Sprouts-potato Curry

Thank you GM for sharing this recipe. It’s really is a very neat and clever idea that I am going to apply quite regularly from now on. Who wouldn’t love soft chapatis anyway?

Posted by Indira©Copyrighted in Avocado,Wheat Flour (Durum Atta) (Tuesday January 31, 2006 at 4:46 pm- permalink)
Comments (48)

The New Home of Mahanandi: www.themahanandi.org

Chestnut-Almond Cookies

For Indian recipes, I can’t and won’t break the tradition and I will always follow the elder’s footsteps in preparing food. I believe the ingredients they use for a particular recipe have been chosen for a reason, and the steps they followed to make a recipe work are methodic, implicitly giving a perfect taste and nutritional boost.

But when it comes to western food, since I ‘m not used to making these traditionally, I feel very free to experiment. Also I believe most of ‘traditional’ recipes that I see in magazines and TV shows are the stuff that they makeup as they go, to promote some food ingredients or products following the corporate orders. When food ingredients have their own associations and mega budgets to promote and influence peoples opinion in their favor with advertisement blitzes, I am not sure how traditional most of these recipes are, though they proclaim otherwise.

Chestnut cookies first posted by Mine of Teatime then submitted to cookie swap event by Ulrike of Kuchenlatein, captivated me mainly because they sounded real authentic, traditional and old world. When I saw the beautiful photographs, I so wanted to try these cookies. I changed few things here and there, going all the way to make them rustic pure. Use of molasses in place of powdered sugar, turned the cookies golden brown instead of creamy white. I tried decorating cookies differently, but it didn’t come out as I expected. Except for that one gaffe, the cookies turned out to be mouthfuls of wholesome goodness. Thanks Mine and Ulrike for sharing this wonderful, traditional recipe.

Molasses, All purpose flour, Almonds, Roasted Chestnuts, Clove, Cardamom, Cinnamon

Recipe:

2 cups of almonds, soaked in water overnight, then skins removed
15 chestnuts, roasted, then shells removed
1 cup of all purpose flour
11/2 cups of molasses
(Molasses is an acquired taste, difficult to like. Sugar/honey works fine too)
2 egg whites
1 inch cinnamon, 1 clove, and seeds from 1 cardamom pod – finely powdered together

Powdering Almonds and Chestnuts in a Food Processor Almond-Chestnut cookies all ready to go into oven
Powdering Almonds and Chestnuts in a Food Processor…Almond-Chestnut cookie dough, ready to be baked

Preparation:

Powder the almonds and roasted chestnuts in a food processor to a smooth powder. Make it easy on the motor and do it in batches. In a vessel, take egg whites and beat them until they turn to foamy white. To these egg whites, add molasses and cardamom-cinnamon-clove powder. Mix and stir in all purpose flour and almond-chestnut powder. Mix them thoroughly. Shape the dough into a log, wrap it in a wax paper and store it in the freezer, until the cookie dough firms up. I had to keep it overnight in the freezer.

Preheat the oven to 350° F. Remove the hardened cookie dough from the freezer, cut it into 1 to 2 inch rounds crosswise. Place them neatly in rows on a greased or parchment paper lined baking tray. I egg washed the tops and sprinkled some brown sugar on top of each cookie, my idea of decoration, not so successful, I have to say.:) Place the baking tray in preheated oven and bake them at 350°F for about 20 minutes.

Believe it or not, they tasted like, do you know the South Indian sweet “Ariselu“, exactly like that. Roasted chestnuts and molasses gave a special and characteristic taste to these cookies, a first for us and we liked them very much.

chestnut cookies
Chestnut-Almond Cookies

Posted by Indira©Copyrighted in All-Purpose Flour(Maida),Almonds,Chestnuts (Marrons),Molasses (Tuesday December 13, 2005 at 7:16 pm- permalink)
Comments (12)

The New Home of Mahanandi: www.themahanandi.org

« Next PagePrevious Page »