Mahanandi

Living in Consciousness ~ Indi(r)a’s Food and Garden Weblog

Avocado Chapatis

Why didn’t I think of this idea before? That is what I thought, when I read the post “Avocado Parathas” by GM of ‘The spice is right’ food blog.

I know that avocado is nature’s ghee/butter. And just like them, ripe avocado is full of fat and has no significant taste to speak of. Avocado’s mashed pulp easily mixes with all kinds of ingredients and helps to make their flavors stand out. I had to give it a try.

Yesterday, I tried the recipe. The result – very smooth, tasty chapatis, the kind we know from India and dream of making it here in US. Smooth, silky flesh of ripe avocados when mixed with chapati flour, magic happened. All the fat in avocado made the flour softer, very pliable, easy to handle and chapatis off the griddle (tava), remained soft even after 6 hours. In this cold, winter weather, that’s a miracle, if you ask me.

Ripe Avocado and Wheat flour with red chilli-garlic powder and salt

Recipe:
for 10 to 12 chapatis

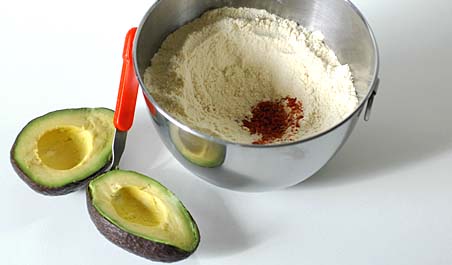
2 cups of durum wheat flour
(I used Golden Temple brand wheat flour, available in Indian grocery shops)
1 very ripe avocado (more about avocado-here)
1/2 tsp of salt
1/2 cup of warm water
I also added 1/4 tsp of red chilli-garlic powder for a little bit of hotness

 Chapati Dough made with wheat flour and avocado paste  Rolling out chapati in round shape

Preparation:

Avocado: Take a ripe avocado; cut it into half, going around the pit (seed) in the middle. Twist and separate two halves. Stab the knife into the pit; pull it out, the pit will come out easily. Scoop the flesh of avocado using a spoon, from each half. Take it into a small cup; mash it to a smooth paste, using your fingers or with a spoon.

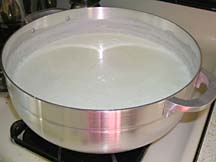
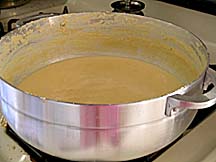
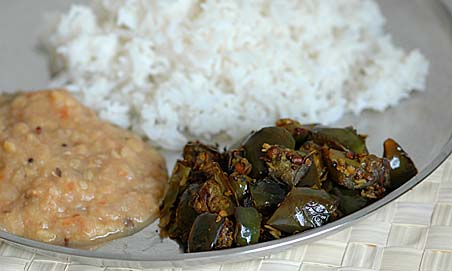
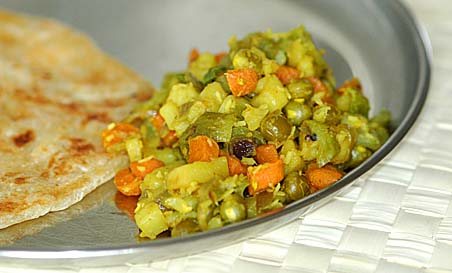
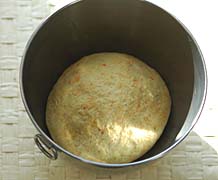
Flour: Take flour in a big vessel. Sprinkle in salt and red chilli-garlic powder, and mix the flour. Then add the avocado paste to the flour and mix thoroughly. Now gradually adding water, make firm dough. Make sure that dough is not too soft or too hard. Knead the dough for two minutes. Cover and set it aside to rest for about 15 to 30 minutes. In the meantime, prepare a curry for avocado chapatis. I made Brussels sprouts-potato curry.

 Shaping the chapati in triangle shape  Cooking chapati on hot iron tava

Rolling out Chapatis:
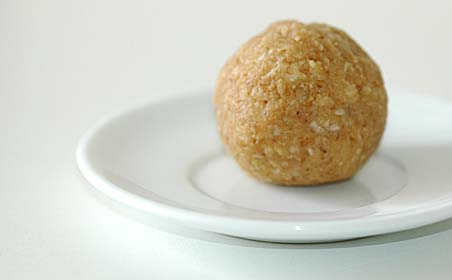
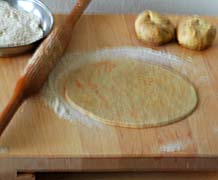
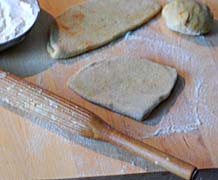
Knead and rollout the dough into a cylindrical long roll on a wood board. Take small lime sized portions and using hands, shape each into a smooth ball shape.
Take the dough ball on a clean wood board, sprinkle some flour on it and around. Using a rolling pin, press/roll out the dough into a big thin round. You can fry it on a hot griddle or to get more flaky layers, what I usually do is, fold the rolled out round twice, to get a triangle shape (see the photo above) then roll into a big, thin triangle.

Cooking chapatis:
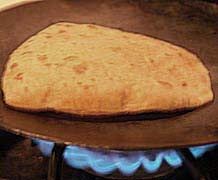
Heat a cast-iron griddle/tava, when it is hot, place the chapati and cook it on each side until golden. While the chapati is cooking on hot tava, I roll out another chapati for frying. I usually make 6 chapatis for the two of us for a meal, takes about 15 to 20 minutes maximum.

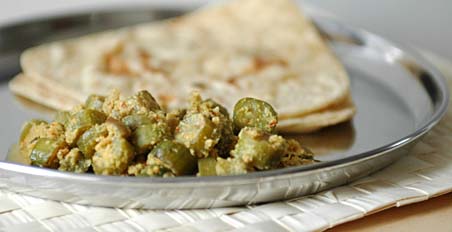
Serve hot with curry or dal.

Avocado Chapatis with Brussel Sprouts Curry
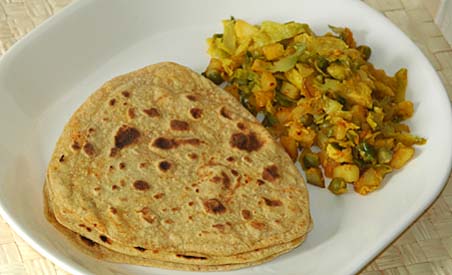
Avocado Chapatis with Brussels Sprouts-potato Curry

Thank you GM for sharing this recipe. It’s really is a very neat and clever idea that I am going to apply quite regularly from now on. Who wouldn’t love soft chapatis anyway?

Posted by Indira©Copyrighted in Avocado,Wheat Flour (Durum Atta) (Tuesday January 31, 2006 at 4:46 pm- permalink)
Comments (48)

The New Home of Mahanandi: www.themahanandi.org

Pasta in Chilli, Bell Pepper and Peanut Sauce

“What Kind of Food Are You?” – I tried the fun quiz of 5 questions. I expected Indian, but I don’t think the quiz has Indian food in its list of responses. The answer was ‘Italian food’, and I was satisfied. Like Indian, I think of Italian as another no-nonsense, honest kind of food. Though here in US, a little bit over glorified. What? Have you been watching food TV (US) lately? It should be renamed ‘Italian Food TV’ with its 24-hour Italian this and Italian that programming, and its star-cooks falling over themselves proclaiming their Italian heritage. Sometimes I wonder, why am I paying money for this channel on cable, is this a foodtv or a propaganda machine for Italian cuisine. It would be understandable if majority of Americans are Italians or Italian decent, but that is not the case and further, the minority (here the minority status is determined by the skin color) means non-whites, are climbing up to almost 40%. More and more, it looks like American Food TV has decided to disregard diversity and showcase only one cuisine at the expense of others. What a sad, sad thinking!

Well, I am glad to contribute one more recipe of pasta to IMBB #22, the mother of all events and most popular one in food blogosphere, this month hosted by lovely Amy of ‘Cooking with Amy’ fame. Even though I think of my contribution an original, I am sure there is someone, somewhere already written down this version of pasta sauce. Thousands of dedicated Italian cooks, cookbooks and hundreds of fabulous food bloggers, recipe sites – millions of pasta recipes, it got to be there, somewhere. No… then I am happy to cook up millionth one recipe of pasta.:)

spaghetti, red bell pepper, Tomatoes, Roasted Peanuts, olive oil, Onions, Dried red chillies and garlic

Recipe:

Pasta: I used spaghetti, Hodgson Mills brand, whole wheat with flax seed and organic variety. Like pulao/pilaf taste depends on basmati rice, a good pasta dish needs quality pasta. So I do spend few extra bucks on a fine variety. Hodgson Mill brand without a doubt, quality products.
One fistful of spaghetti for one person – that is the measurement I use for spaghetti.

For Sauce:
1 cup of peanuts – roasted and skins removed
3 red bell peppers – deseeded, cut into big chunks
4 dried red chillies and 4 garlic cloves – halved
3 ripe, juicy tomatoes – chopped into big chunks
1 small red onion – chopped into big chunks
1 tablespoon of olive oil
1 tsp of each-cumin, salt and powdered jaggery/sugar
I prefer to have sauce, lots of it with my pasta, so the above quantities.

Peanut-Veggie Sauce Spaghetti in pasta sauce

Preparation:

Pasta Sauce: Roast the bell peppers, dried red chillies, tomato, onion, garlic and cumin in 1 tsp of olive oil, until they all are brown and golden. Let them cool down to room temperature.

In a food processor, first add roasted peanuts and make a fine powder of them. To it, add the roasted veggies and half teaspoon of salt. Add half cup of water and grind them into smooth paste.

In a big wide pan, heat olive oil and add the peanut-veggie paste. Add one cup of water, jaggery and salt to taste. Mix and cook covered for about 10 minutes on medium-low heat.

Pasta: While the sauce is simmering, bring a large pot of salted water to a boil. Cook the pasta al dente, usually for about 5 to 8 minutes. Drain the pasta into a colander, immediately add it to the sauce. Mix it thoroughly with pasta sauce. Cook, uncovered for about 2 minutes on low heat and serve.

The sauce can be made earlier and just before mealtime, pasta can be cooked and added. One thing I learned about pasta is, it has to be served hot, to get the best taste.
Spaghetti in Chilli-Red bell pepper- peanut sauce

Pasta in chilli-red bell pepper-peanut sauce: sweet, spicy, savory and smoky – A range of delicious flavors, all blended well together for a wholesome, hearty, filling meal ~ Our Sunday dinner and my entry to IMBB Event.

Recipe Source: My Own Creation
Tagged with: +

Posted by Indira©Copyrighted in Bell Pepper,Dried Red Chillies,Pasta,Peanuts (Monday January 30, 2006 at 8:32 am- permalink)
Comments (30)

The New Home of Mahanandi: www.themahanandi.org

Cashew~Walnut Laddu (Kaju-Akhrot Burfi)

When I invited my friends to celebrate Sankranthi festival, in addition to the traditional ‘sweet pongal’, I also prepared cashew walnut laddu. Low in sugar calories, high in nut energy! Cashews and walnuts are first roasted and powdered, then cooked in milk-sugar kova till they all came together into solid fudge like consistency. Cooling further solidifies the mixture and then small portions are taken and shaped into rounds -‘laddus‘ or cut into squares-‘burfis‘. I like the round shape, so I always go with round laddus. Very convenient to hold and eat, children particularly love laddus.

Cashews, Walnuts, Milk and Sugar in the Background

Recipe:

Half gallon- Whole milk
2 cups-sugar (3 cups if you like the laddus on the sweeter side)
1 cup – cashews
1 cup – walnuts

Preparation:

Milk and Sugar: In a thick bottomed big pot, bring milk to boil. Add sugar. Stirring occasionally, simmer the milk-sugar mixture until it gets thick and is reduced to about one fourths of the original quantity. It takes at least 45 minutes to one hour.:) Do this on medium heat. Avoid high heat and take care not to scald the milk.

Cashews and Walnuts: Meanwhile, lightly roast cashews and walnuts separately in an iron skillet. Let them cool down to room temperature. Separate 10 pieces from each and chop them into small pieces. With the remaining ones – make fine powder of them in a food processor/mixer.

Milk and sugar simmering thickened milk and sugar after 1 hour on the stove
Milk and sugar simmering………………..Thickened milk and sugar kova after one hour on the stove

Kova into Laddu: Add this fine powder to the thickened milk-sugar kova and cook for 15 minutes, stirring continuously, until the mixture is firm. Sprinkle chopped chunks of cashews and walnuts that were kept aside. Continue cooking for another 10 minutes until the mixture is almost crumbly and comes away easily from the sides of pan.

Take a spoonful of mixture and press it with your hands into a ball. If it holds shape, then mixture is ready for cooling. Turn off the heat. Spoon the mixture into a greased square or round pan. Level it with a spatula and let it cool for at least 4 to 5 hours. Cut into squares for burfis or take a spoonful of mixture, shape it with your hands into a round ball for laddus. Store the laddus in glass jar. They will stay fresh for upto one week.

(This recipe makes 15 medium sized laddus.)

Cashew-Walnut Laddu

One medium sized cashew-walnut laddu, my entry to ‘Sugar-Low Friday’ event hosted by lovely Sam of Beck & Posh.

By the time my friends left, I had only four laddus remaining out of 20. Two for me and two for Vijay, enough for us. This is how I do my ‘Sugar – Low’, by portion control. In my view, this is also one of the ways to lower the sugar consumption.

Tagged with:

Posted by Indira©Copyrighted in Cashews,Indian Sweets 101,Milk,Mitai,Sugar,Walnuts (Friday January 27, 2006 at 7:16 pm- permalink)
Comments (26)

The New Home of Mahanandi: www.themahanandi.org

Brinjal-Ginger Curry

Purple Brinjal - Indian Variety

In old times, the marriage feast in our areas always included brinjal-ginger curry. Considered a classic both in taste and aroma, brinjal-ginger curry brings out the best of both ingredients.

Recipe:

10 round brinjals – (purple or greenish-white)
1×1 inch fresh ginger
4 green chillies
4 sprigs of fresh cilantro
½ tsp of salt and turmeric each
For popu: 1 tsp each – mustard seeds, cumin, urad dal, curry leaves and 2-3 pieces of dried red chillies

Preparation:

Brinjal: Wash and cut brinjal into bite sized pieces. Take water in a vessel; add 1 tsp of salt and mix. Add the cut brinjal pieces to this salted water. This is again an old-time tip, to prevent discoloration and onset of sourness in cut brinjals.

Ginger: Scrape the skin and wash. Finely chop ginger, green chillies and coriander. Add pinch of salt, make a smooth paste in a mortar or using a blender, without adding any water.

Curry: Heat one teaspoon of peanut oil in a wide pan. Add all the popu ingredients listed above and toast them till the seeds start to splutter. Take cut brinjal pieces from water, fistful each time, add them to the spluttering popu ingredients. Stir in the ginger paste and turmeric. Mix them all together, reduce the heat to medium-low. Cover with a lid and cook, stirring only once for about 10 minutes. When the curry starts to smell incredible, pieces turn to soft, sprinkle salt, mix and turn off the heat. Serve with rice and dal.

Brinjal Curry, Tomato Dal and Rice - Our Lunch

Brinjal-Ginger Curry, rice, tomato dal and little bit of ghee – savoring the tasty stroll in Andhra food heaven.

note to readers: Add salt at the end (so that brinjals can cook fast) and the recipe works only with fresh green chillies, don’t substitute with red chilli powder.

Posted by Indira©Copyrighted in Amma & Authentic Andhra,Ginger & Sonti,Vankaya (Brinjal) (Thursday January 26, 2006 at 2:36 pm- permalink)
Comments (23)

The New Home of Mahanandi: www.themahanandi.org

Cranberry Jam

Cranberries and Orange

When I first made cranberry jam, I was pleasantly surprised at how good it turned out. One wintry day, on a whim, I cooked up cranberries with orange juice and added some jaggery – viola, a spectacularly delicious tartly, tangy and sweet jam in a beautiful shade of Burmese ruby.

Tart cranberries and tangy oranges, in brilliant red and orange colors, dazzled me with promises of healthy glow and much needed Vitamin C. Who would think that, these two beautiful looking tarts taste that good when combined. Adding another tartly, sweet ingredient – jaggery, completed and complemented those two – making the end result, a tasty jam/preserve to enjoy.

Native Indian and Indian ingredients for a western style breakfast of bread and jam – cost is low, recipe is easy, preparation time minimal. Give it a try, if you haven’t already.

Cranberries, Orange Juice and Powdered Jaggery

I usually make this jam, in small quantity for a week’s worth, but never in big batches like the seasoned jam makers do. So I’m not familiar with the sealing techniques for long-term storage etc., can’t offer any tips about that. My jam never lasted more than a week.

Recipe:

1 bag (12 ounces) of fresh cranberries
2 cups of freshly squeezed orange juice (4 to 6 oranges)
¾ cup of powdered jaggery (½ cup to 1 cup, how sweet your choice, I used ¾ cup)

Rinse the cranberries thoroughly. Pick out the bad ones, that are soft, shriveled or discolored. In a large pot, take orange juice and jaggery. Cook them until jaggery melts completely. When the juice starts to thicken, stir in the cranberries. Cook for about 15 to 20 minutes on medium heat, stirring in between. Cranberries first pop, then break down completely and turn into thick mush. Turn off the heat when it reaches jam like consistency, it further thickens on cooling. Store in a clean, dry jar.

Cranberry Jam on a Slice of Whole Wheat Bread
Cranberry jam on a toasted slice of whole wheat bread ~ our breakfast this week

Posted by Indira©Copyrighted in Citrus Family,Cranberries,Jaggery (Tuesday January 24, 2006 at 2:59 pm- permalink)
Comments (57)

The New Home of Mahanandi: www.themahanandi.org

Dried Ginger Ale (Sonti Kashayam )

I was tagged by lovely Rosa of Yummy Yums to list my cold/flu remedies. Like her, it’s been a while, 10 years to be exact, since I got sick. I go through mental up&downs like a normal human being, but physical ailments like common cold/flu, fever etc., nothing, nada, zip. My immune system, like me, seems to be enjoying an early retirement deal. Or overworking? Anyway, the deal is not bad at all.

Home remedies for common cold & flu, that I can think of, like and often prepare-cold or no cold, are- one is tomato rasam, I blogged already and the other is ‘sonti kashayam’. This traditional remedy, an ayurvedic weapon against cold/flu is prepared with dried ginger, black peppercorns and sweetened with jaggery or honey. The resulting concoction is one strong drink that reboots the downgraded systems, starting with GI. Body on fire, is the sensation it gives at first. Then once it settled down there, ginger and peppercorn work their magical powers and make the symptoms of cold/flu disappear.

Sonti (Dried Ginger), Black peppercorns and Jaggery

Recipe:
(For two cups)

1 inch length dried ginger (Sonti) (available in Indian grocery shops)
4 peppercorns (Miriyalu)
1 tsp of powdered jaggery or honey
1 glass of water

Preparation:

First, make a powder of dried ginger and peppercorns using a mortar and pestle. Meanwhile take water in a pot, bring it to a rolling boil. Add the powdered ginger, pepper and jaggery to the water. Cover partially; boil it for at least 5 minutes. Turn off the heat, cover completely, and let it rest for 5 minutes. After 5 to 10 minutes of rest period, using a filter, pour the drink into a glass. Stir to cool and finish it off in two or three gulps.
Set the body on fire and say goodbye to cold/flu symptoms.

Variation – add tealeaves to make an extra strong tea or plain soda (carbonated water) to make ale.
A Drink of Sonti Kashayam (Dried Ginger Ale)

A glass of Sonti Kashayam (dried ginger ale)

I like this meme (to spread) and I would love to learn other food bloggers remedies for common cold/flu. So I’m going to tag

Barbara of Tigers and Strawberries
Barrett of Too Many Chefs
Brett of In Praise of Sardines
Doc of Gluttony is no Sin
Heidi of 101 Cookbooks (Thank you Heidi, for ‘Daily Links’)
Kay of Towards a Better Tomorrow
Stephanie of Dispensing Happiness

I’m sure they have some fabulous remedies up their sleeves and I hope they share them with us
.

Posted by Indira©Copyrighted in Amma & Authentic Andhra,Ginger & Sonti (Monday January 23, 2006 at 9:11 am- permalink)
Comments (28)

The New Home of Mahanandi: www.themahanandi.org

Steelers To Super Bowl

To Super Bowl, after this game!

Steelers Flag
Steelers game today at 3pm, EST on CBS.
Steelers flag Image is taken from this site.

Posted by Indira©Copyrighted in Zen (Personal) (Sunday January 22, 2006 at 11:34 am- permalink)
Comments (8)

The New Home of Mahanandi: www.themahanandi.org

Weekend Cat Blogging

Darling Kittaya

Darling Kittaya

Vijay was taking photos for ebay auction last week and this guy walked into the setting, posed for us, adorably.

Posted by Indira©Copyrighted in Kittaya (Saturday January 21, 2006 at 8:21 am- permalink)
Comments (5)

The New Home of Mahanandi: www.themahanandi.org

Ridge Gourd,Potato & Carrot Curry

Ridge gourd, potato and carrot – this is a veggie match, made in an Indian kitchen. Their flavors compliment each other and when combined with some onion, green chillies, coconut, they make a fresh, satisfying side dish.

This is the kind of veg-medley I love to make when I’m short on time. A pleasing, sweet-spicy taste that pairs well with rice and dal or with chapatis and corn tortillas. Tasty and flexible, lot of curry in less time – what more one could want in a recipe?

Ridge Gourd, Carrot, Potato, Red Onion, Dried Peas soaking in Water, Green Chillies and garlic

Recipe:

2 fresh looking ridge gourds (turai, beera kaya): First peel/or scrape the ridges on outside, wash the veggie, then cut it into bite sized pieces.
1 medium sized potato and carrot – peeled, then cut into bite sized cubes
1 onion – finely chopped
5 green chillies and 1 tbs of coconut powder – made into smooth paste
Salt to taste and pinch of turmeric
1 fistful of fresh or dried peas – I used dried peas (soaked overnight in water)
Popu ingredients – 1 tsp each of mustard seeds, cumin, minced garlic and curry leaves

It’s just like regular curry preparation, only thing you have to keep in mind is – first cook potatoes and carrots, add ridge gourd later, as it cooks faster, compared to potatoes and carrots.

Heat one teaspoon of peanut oil in a big pan. Add popu ingredients. When they start to splutter, add onions, saute for few minutes. Stir in peas, potatoes and carrots. Cover and cook them in their own moisture, for about 10 minutes on medium heat.

When they are little bit softened, stir in ridge gourd pieces, salt, turmeric and green chilli-coconut paste. Cover again and cook them, stirring in-between, till they reach the texture/softness you desire.

Serve hot with chapati/paratha or with rice and dal combination.

Beerakaya kura and paratha
Ridge gourd curry and paratha ~ Our lunch.

Posted by Indira©Copyrighted in Beera kaaya(Ridge Gourd),Carrots,Indian Vegetables,Potato (Wednesday January 18, 2006 at 4:16 pm- permalink)
Comments (21)

The New Home of Mahanandi: www.themahanandi.org

Amla Pickle (Usirikaya Uragaya)

I bought a quite few amlas (usiri kayalu, Indian Gooseberry) at Toronto and I couldn’t resist making a small batch of pickle with them, following a recipe from Malathi Chandur’s cookbook – “Vantalu-Pindi Vantalu“. The pickle turned out to be hot, spicy good.

Amla, Usiri Kaya, Indian Gooseberry

Recipe:
For 15 amlas

15 clean, fresh looking, blemish free amlas (usiri kayalu)
½ cup peanut oil
¼ cup of salt and red chilli powder
¼ cup of mustard seeds – roasted & finely powdered (aava pindi)
½ tsp of asafoetida (inguva)

Preparation:

First wash the amlas and dry them using clean cloth, without any sign of moisture.

Heat up 1 tablespoon of oil in a skillet and add the amlas and sauté them till they turn light brown. Remove and let them cool down to room temperature.

Heat the remaining oil in another pan to a smoking point. Remove it from heat, let it cool down to room temperature.

Add salt, red chilli powder, mustard powder and asafoetida to the roasted amlas. Mix them all with a clean, dry spoon. Pour and stir in the heated (now at room temperature) oil. Mix them all together, again with a clean dry spoon. Cover tightly and let it stew at least for two weeks. The more you wait, the tasty the pickle becomes and the normal waiting period is one month. I couldn’t wait that long.:)

Just before serving, do the popu or tadka. Heat 1 tsp of oil in a pan, fry red chilies, cumin and mustard seeds until they splutter, then add garlic flakes and remove from the heat. Add it to the pickle, mix thoroughly and serve with rice and dal.

Usirikaya Pacchadi, Amla Pickle

Amla Pickle (Usiri kaya Uragaya) – spicy and sour like mango pickle and quite tasty in this cold winter weather.

Recipe Source: Malathi Chandur’s Cookbook “Vantalu-Pindi Vantalu

Posted by Indira©Copyrighted in Amma & Authentic Andhra,Dried Red Chillies,Usiri Kaya (Amla) (Tuesday January 17, 2006 at 9:43 pm- permalink)
Comments (38)

The New Home of Mahanandi: www.themahanandi.org

Sweet Pongal, The Sankranthi Sweet

Sankranthi:

Harvest festival Sankranthi is all about celebrating rice in our part of world. Particularly in South India, rice plays an important role as the main cultivated grain and as nourishing food that people subsist on every day of their life. It’s no wonder that there is a festival dedicated to the almighty rice. Equally worshipped are the man’s best partner, the kind-hearted cow, and the elements – sun, earth and water. They make rice cultivation a success, and also add a magic touch to the rice, making the rice a cherished, beloved food of the people.

Sona Masuri Rice - Grown and Imported from Andhra, India
Sona Masuri Rice – Grown and Imported from Andhra Pradesh, India

Sweet Pongal (Tiyya Pongali):

This famous south Indian, Sankranthi sweet is traditionally made with freshly harvested rice. Very simple to make but spectacular in taste, the ordinary rice becomes mouthwateringly extraordinary in sweet pongal. The rice soaks up the milk, absorbs the jaggery, picks up the cardamom scent and takes up the generously added moong dal, cashews and golden raisins. And in this new avatar, becomes an offering to the Gods (naivedyam, we call it), and also simply irresistible to all who try it.

Some Tips:

Jaggery:

I follow the classic recipe and don’t do or like shortcuts. Method is neat and easy and the end result is always like the prasadam offering of temples. Jaggery is the traditional sweetener of sweet pongal and my choice too, simply because sweet pongal tastes better when made with jaggery and not sugar.

Rice:

The rice that I prefer is Sona Masuri. Because this variety is grown and imported from my home state Andhra Pradesh, and is the variety that I grew up on. Grain is thin, medium sized and very lightweight. Available in almost all Indian grocery shops here in US. Little bit pricey, but the taste is worth the money and farmers in my state really can use the money. Support farmers and buy this rice.

Consistency:

Sweet pongal is like a rice-dal porridge, consistency must be gooey thick and sticky. That means, the amount of liquid I usually add for sweet pongal recipe is more than the amount that I normally add to cook plain rice of equal measurements. Also, I always use equal amounts of water and milk for this recipe. Variations are – you can cook the rice-dal entirely in milk or in coconut milk, or if you are lactose intolerant and diet conscious, then in just plain water. Just add more liquid compared to the regular rice preparation.

Rice, Yellow Moong Dal, Cashews, Golden Raisins, Cardamom and Jaggery

Recipe:
For two people

1 cup – Sona Masuri rice
½ cup – yellow moong dal (pesara Pappu)
1 – 1½ cups – jaggery, crushed to fine
¼ cup each – cashews and golden raisins
¼ cup – ghee, melted
4 cardamom pods – skins removed and seeds powdered finely
3 cups each – milk and water (or 2 cups each, if you like a halwa like pongali)

Here is the 3-step method I follow to prepare sweet pongali at our home.

1.Toast and Roast:

Yellow moong dal:
Heat one teaspoon of ghee in an iron skillet. Add and roast yellow moong dal, on medium heat, until the color changes from yellow to pink. Take care not to brown. Slow-roasting freshens up and imparts a sweet smell to yellow moong dal. Remove them to a plate and keep aside.

Cashews and Golden raisins:
In the same skillet, add and heat two teaspoons of ghee. Add and fry the cashews and golden raisins till they turn to light gold. Remove and keep them aside.

Jaggery Syrup Cooked Rice-Dal Mixture is added to Jaggery Syrup
Jaggery syrup simmering…………Cooked Rice-Dal Mixture is added to Jaggery Syrup

2.Cook and melt:

Rice, moong dal and milk:

Take rice and roasted moong dal in a pot. Add water and milk. Mix well. Partially cover the pot and cook the rice and dal to tender soft. I use a pressure cooker but an electric rice cooker also works fine. Stove-top slow simmering also produces best tasting pongali.

Jaggery and water:

While the rice is cooking, in another pot, melt jaggery. Add the powdered jaggery and one cup of water. Stir and cook till jaggery melts. Bring the solution to a rolling boil. and reduce the heat and simmer for about five minutes. Turn off the heat. Let the jaggery syrup cool a bit.(Jaggery has to be cooked separately and you can’t add it directly to uncooked rice and milk. Because it prevents the rice from cooking properly and also splits the milk. Please keep this in mind.)

3. Stir and Simmer:

Adding the cooked rice: Add the cooked rice-dal pongal to jaggery syrup. Keep the heat on medium. Stir in the ghee, cashews, golden raisins and cardamom powder. With a strong laddle, stir well to combine all. Cover and simmer until the whole mixture comes together into a sticky, gooey mass. Turn off the heat. Cover and let it sit for 10-15 minutes. Sweet pongal thickens further on cooling.

First offer to Gods as naivedyam (if you have this tradition), then serve it your loved ones, near and dear. Don’t forget to drizzle some ghee just before serving.

Sweet Pongal (Tiyya Pongali) - The Traditional Sweet of Sankranthi
Heavenly Sweet Pongal

For people hungering for a traditional, naivedyam kind of recipe but don’t have time or energy to make puran poli (bhakshalu), sweet pongal is The one. Speaking from experience, my suggestion is, keep your reservations aside and try it. You’ll be glad and can be proud of yourself for finally making one decent kind of naivedyam. I promise! Follow the recipe and this ancient classic delivers every time. People would ask for a second serving, diet or no diet.

Posted by Indira©Copyrighted in Amma & Authentic Andhra,Cashews,Ghee,Golden Raisins,Indian Sweets 101,Milk,Moong Dal (Washed),Naivedyam(Festival Sweets),Sona Masuri Rice (Monday January 16, 2006 at 3:08 pm- permalink)
Comments (79)

The New Home of Mahanandi: www.themahanandi.org

Steelers in Playoffs

Steelers Flag

They say Steelers are the underdogs.

They say steelers have no choice, but to lose today opposite Colts.

The victory is going to be that much sweeter!

Go Steelers!

Steelers game today at 1 pm, EST.
Steelers flag Image is taken from this site

Posted by Indira©Copyrighted in Zen (Personal) (Sunday January 15, 2006 at 12:37 pm- permalink)
Comments (6)

The New Home of Mahanandi: www.themahanandi.org

Celebrating Sankranthi

The holiday season is my favorite time of the year and our holiday or rather festival season starts with Vinayaka Chavati in August ends with Sankranthi, in January. First Vinayaka Chavati, then Dasera, Deepavali and Halloween, followed by Thanksgiving and Christmas, rolling right on through the New years eve to Sankranthi. In between all these festivities, both of our birthdays and our marriage day falls. So every year, I look forward to August, for good times. And the Hindu festivals I listed above, are major ones, if one follows a true Hindu calendar, it’s going to be a festival, every other week.:)

To celebrate Sankranthi on 14th, we invited few of our Pittsburgh friends for festival lunch and we are planning to prepare a traditional meal. The menu we finalized is this:

Traditional Festival Day Lunch Menu:
Papads – sabudana, rice and urad dal varieties
Bajjis – Onion and potato
~~~
Pulihora (Tamarind Rice)
Plain rice
Tomato Dal
Okra Sambhar
Potato Curry- festival day type
Drumstick (Munaga) kurma
Peanut chutney – Rayala seema style
Yogurt
Ghee
~~~
For Naivedyam – Sweet Pongal, the traditional sweet of Sankranthi
Cashew – Walnut Laddu
Fruit Platter

I’ve shopping to do, house to clean, puja mandir to decorate and some prep work to do in the kitchen before Saturday. So, see you all after Sankranthi and have a great Sankranthi celebration or a neat weekend.

Posted by Indira©Copyrighted in Zen (Personal) (Friday January 13, 2006 at 6:01 am- permalink)
Comments (29)

The New Home of Mahanandi: www.themahanandi.org

Ridge Gourd in Tomato Sauce (Beerakaya Pulusu)

Ridge Gourd, Beerakaya, Turai

Ridge gourd is often compared to zucchini, the squash. But the comparison is like saying potato and sweet potato are the same. Except for where they come from, there is no comparison at all taste wise, between those two.

Ridge gourd has a firmer, less watery texture than zucchini, and the flavor is much more intense and sweet, where as Zucchini seems to be full of water and nothing else when cooked and too bland to taste. Given a choice, ridge gourd clearly comes out as the winner, taste wise. Though I dislike character less personalities in life, I do like the bland zucchini. It took some time but it won me over. In case of ridge gourd, I may have made complaining noises about other veggies but never about ridge gourd or ‘beerakaya’ we call it in Telugu. Be as curry or chutney or in dal, I relish ridge gourd in all forms. I even tried growing it here, when we were in Houston albeit unsuccessfully, not good seeds.

Here is a recipe of ridge gourd in tomato sauce, Vijay’s favorite and My Mother-in-law’s recipe:

Ridge Gourd, Tomato, Onion, Dhania Powder, Green Chillies and Turmeric

Recipe:

2 young looking, fresh ridge gourds
Scrape the skin and ridges, wash, then cut into bite size pieces
4 ripe juicy tomatoes – finely chopped
1 onion – finely chopped
4 green chillies
—————-
1 tablespoon of coconut powder
½ tsp of dhania(coriander) powder & turmeric
¼ tsp of salt – or to your taste
Popu ingredients – 1tsp each of mustard seeds, cumin, curry leaves & minced garlic

Preparation:
You know the drill. Heat peanut oil, do the popu, sauté onions, tomatoes and green chillies. Add chopped ridge gourd and all the seasoning. Stir to mix and cook, covered. Tomato juice and water that comes from cooked ridge gourd pieces is going to be enough to make the curry a stew/kurma type. So don’t add any extra water, unless you want a watery, thin version. Cook till ridge gourd pieces are tender and the sauce thickens. Serve it warm.

Though I have to say my favorite is always the dry curry recipe, that I posted a while back, I also make this sauced version sometimes, because Vijay likes it. Either as a sauce for pasta/with chapati/ or with rice, this curry tastes good. Sometimes, we do the dunking thing with toasted garlic bread. Good eat, any way you prefer.

Cooking Ridge gourd (Beerakaya Curry
Cooking ridge gourd (beerakaya, turai) in tomato sauce.

Recipe source: Attamma(MIL)

Posted by Indira©Copyrighted in Amma & Authentic Andhra,Beera kaaya(Ridge Gourd),Indian Vegetables,Tomato (Wednesday January 11, 2006 at 1:59 pm- permalink)
Comments (23)

The New Home of Mahanandi: www.themahanandi.org

Tindora In Sesame Sauce (Dondakaya-Nuvvula Kura)

Another recipe with tindora (ivy gourd, dondakaya, Kovakku), this time with a sauce. Sauce is prepared from roasted sesame seeds, fresh coconut and dried chillies, sweetened with little bit of jaggery. Usually sesame sauce calls for the addition of tamarind, but in this case, slightly sour taste of tindora cancels the need for tamarind.

A different recipe, sweet and sour – because of jaggery and tindoras, nutty and nourishing due to sesame-coconut combination. A must try, for those of you who are interested in cooking up something new with tindoras.

Tindora slices, Onion, jaggery, Sesame Seeds, Dried Red chillies, Fresh Coconut

Recipe:

20 fresh tindoras – each, cut crosswise into rounds (3 to 5),
1 medium sized onion – finely chopped
½ cup sesame seeds
¼ cup powdered coconut – I used fresh coconut-oven dried
4 to 6 dried red chillies
1 tablespoon powdered jaggery (or to your taste)
½ teaspoon salt and turmeric
Popu or tadka ingredients

Preparation:

In an iron skillet, lightly toast sesame seeds, powdered coconut and dried red chillies. Cool and take them in a blender or food processor and make a smooth paste.

In a pan, heat one teaspoon of peanut oil, do the popu or tadka i.e. toasting one teaspoon each of mustard seeds, cumin, minced garlic and curry leaves

Add onion, saute a little bit, and then add round slices of tindora. Mix them once, cover and cook, stirring in between for 10 to 15 minutes on medium heat. Allow cooking tindora in its own moisture, sort of steam-saute.

When they are tender and giving off wonderful smell, add the sesame-coconut paste, jaggery, salt and turmeric. Add half glass of water. Stir to mix and cook them covered, until the sauce thickens. Serve warm with rice or chapati.

I have to say this curry tastes great with chapati/roti than with rice.

Tindora in Sesame Sauce with Chapatis
Tindora Curry with chapatis ~ Our lunch today.

Posted by Indira©Copyrighted in Coconut (Fresh),Dondakaya(Tindora),Sesame Seeds (Tuesday January 10, 2006 at 2:24 pm- permalink)
Comments (20)

The New Home of Mahanandi: www.themahanandi.org

Previous Page »