Mahanandi

Living in Consciousness ~ Indi(r)a’s Food and Garden Weblog

Cherry Tomato ~ Basmati Pulao


Tomatoes from My Container Garden

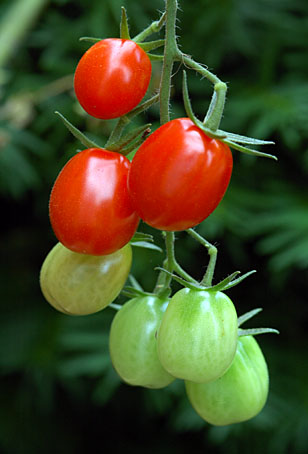
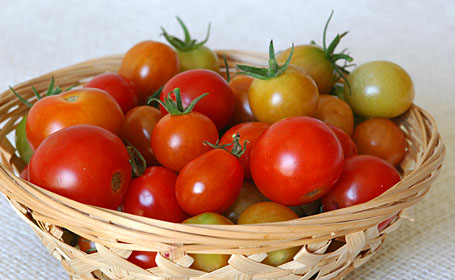
The past week before going on a weeklong working vacation to DC with Vijay, one thing I did was picking the cherry tomatoes from my container garden. There were almost two pounds of tomatoes from 4 plants. I picked even the unripe ones, thinking the plants were not going to survive this hot weather without getting water daily. By the time we returned, we were like fried puris all red and puffed up, whereas our plants were all shriveled up and looking tired because of extremely hot weather. I think there is one more crop in them, that’s all.

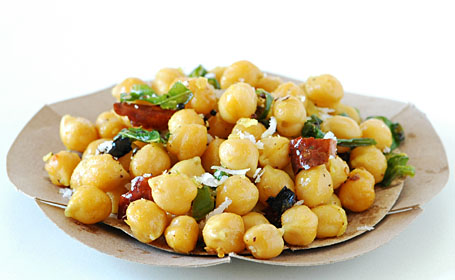
Cherry tomatoes have thin skin, filled with juice without lot of thick flesh, just like the tomatoes that I would find in India. That’s why I prefer them for planting for my container garden every year. They are perfect for curries, rasams, salads and for rice. And one of the best recipes that truly do justice to the incredible flavor of summer tomatoes is tomato pulao. I often prepare it during this season. Quite easy, a one-pot meal and always a crowd favorite, if you haven’t tried tomato pulao yet, trust me and give it a try. Juicy tomatoes and fragrant basmati rice cooked together is a taste that would make you whistle summer tunes.:)


Summer’s Tomato Bounty

Recipe:

Tomatoes and Veggies:
15 to 20 cherry tomatoes or 1 pound ripe tomatoes of any variety – chopped
1 onion and 6 green chillies – finely chopped lengthwise
½ cup of finely chopped fresh cilantro
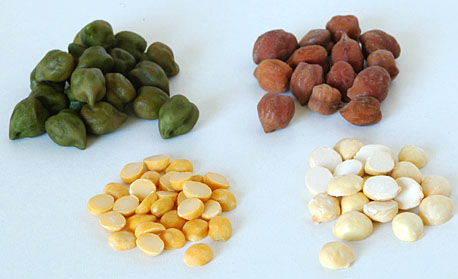
1 cup of frozen fresh chickpeas
(available as ‘Choleye’ in Indian grocery shops-frozen section. Green peas fresh or dried, or roasted cashews – they all taste good with this rice. Your choice.)

Basmati Rice:
1 cup of basmati rice and 2½ cups of water

For Masala:
2 each – cardamom pods and cloves
1 inch piece of cinnamon stick
½ teaspoon of black peppercorn
Coarsely grind these together.
Salt, bay leaf and ghee or oil to taste

1 In a large saucepan, heat ghee/oil. Add and saute the onions until soft and red.

2 Add the green chillies, masala powder, bay leaf and chickpeas, saute for few minutes.

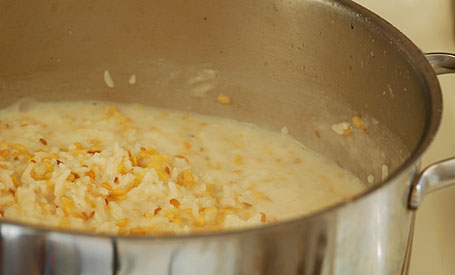
3 Stir in the cut tomatoes, juice, seeds everything. Increase the heat to high, cook them covered until the tomatoes when pressed with a spatula turn to soft, concentrated mush.

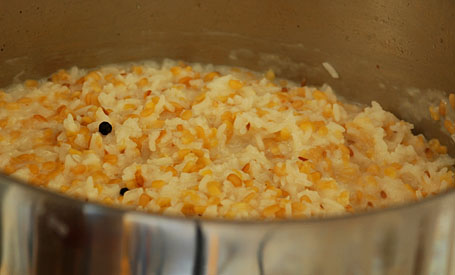
4 Stir in the basmati rice and salt. Add water and mix. On high heat, bring the water to boil. Reduce the heat to medium. Cover and cook for about 10 to 15 minutes or until all the water is absorbed. Mix only once and resist the temptation to stir frequently (frequent stirring breaks the rice and makes a soggy mess.) Turn off the heat and leave it to rest for about 5 minutes. Just before serving, sprinkle fresh cilantro, gently mix taking care not to brake the basmati rice.

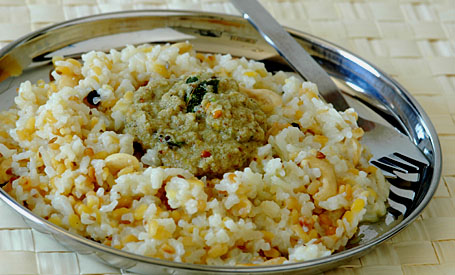
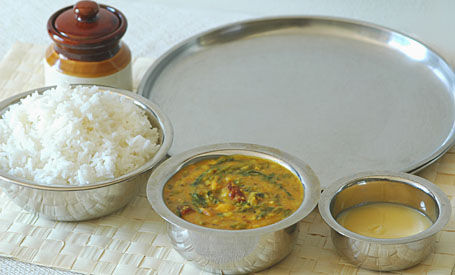
Serve with kurma and/or raita (yogurt is mixed with salt, finely chopped onions, green chillies and grated carrot, cucumber).


From Pot to Plate ~ Tomato : Basmati Pulao with Raita ~ For Green Blog Project”

Posted by Indira©Copyrighted in Amma & Authentic Andhra,Basmati Rice,Biyyamu (Rice),Chickpeas-Black,Tomato (Thursday August 3, 2006 at 2:04 pm- permalink)
Comments (36)

The New Home of Mahanandi: www.themahanandi.org

Chickpea Guggullu ~ Black and White

Black Chickpea Guggullu
Black Chickpea (Kala Chana, Sanaga) Guggullu with Tomatoes and Fresh Coconut

Temple prasadam, beach fare and yogi diet – guggullu (sundal) is a comforting, quick snack item and quite easy to prepare at home also.

Soak the chickpeas overnight in water; cook them until tender and prepare ‘guggullu’ by quickly sauteeing them in few drops of oil, with lot of curry leaves, finely chopped red and green chillies. Sprinkle turmeric and salt to taste. Fresh coconut gratings, sometimes finely chopped tomatoes, onions and green mango are also added just before serving.

Chickpea, (Dubba Sanagala) Guggullu
Chickpea Guggullu with Fresh Coconut

Posted by Indira©Copyrighted in Amma & Authentic Andhra,Chickpeas,Chickpeas-Black (Monday July 24, 2006 at 7:56 am- permalink)
Comments (26)

The New Home of Mahanandi: www.themahanandi.org

Sanagalu (Kala Chana, Black Chickpeas)


One Chickpea (Chana, Choleye, Sanaga) ~ Different Forms
For This Week’s Indian Kitchen

Green fresh chana – Shelled from pods (and available frozen in Indian grocery shops).

Black chickpeas (Kala Chana) – Result of green chana dried under the sun.

Chana Dal (Bengal Gram, Sanaga Pappu) – Prepared by splitting the black chickpeas and removing the brownish-black outer skins.

Roasted Chana Dal (Dalia, Pappulu) – Prepared by roasting black chickpeas in special kilns and then splitting and removing the brownish-black outer skins.

double_curve.gif

Contributions From Fellow Bloggers For Indian Kitchen Series

Kavvam (Buttermilk Churner)
Kavvam (Buttermilk Churner) ~ To “Cool Those Summers”, from Yadbhavishya

Boondhi Maker
Boondhi Strainers and Makers ~ To Prepare Boondhi Laddu, from Foodnewbie

Thanks Vidyanath and Sudha for sending me these photos for Indian Kitchen series.

Posted by Indira©Copyrighted in Chana Dal,Chana Dal-Roasted (Dalia),Chickpeas-Black,Indian Ingredients,Indian Kitchen,Indian Utensils (Sunday July 23, 2006 at 3:08 pm- permalink)
Comments (6)

The New Home of Mahanandi: www.themahanandi.org

Bottle Gourd in Sesame (Sorakaya-Nuvvula Kura)

Few months ago, I wrote about my mother’s recipe of bottle gourd. It is a standard, no fuss kind of recipe with minimum ingredients. I like the taste of that curry and played around with the recipe little bit and came up with this one. It is also a simple no-nonsense recipe and supplies carbos (bottle gourd), protein (black chana) and fat (sesame seeds). I love the taste and also the ease with which it can be prepared.

Bottle gourd Pieces (Sorakaya, Lauki)
Bottle Gourd (Sorakaya, Dudhi) – Peeled, Cut into Cubes

Recipe:

Prep Work:
One cup of black chickpeas (kala chana) soaked in water overnight.
Half of medium-sized bottle gourd (sora kaya, dudhi), peeled and cut into half-inch pieces (about 2 cups)

Cook:
Heat a teaspoon of peanut oil. Toast a teaspoon of cumin, mustard seeds and curry leaves (for tadka).
Add the bottle gourd pieces and soaked kala chana. Saut? for few minutes on medium heat. Add about a cup of water and close the lid and cook.

SesameDalia paste:
Meanwhile prepare the curry thickener. Grind in a blender:
3 tablespoons of each – sesame seeds and dalia
½ tablespoon of each – tamarind juice and powdered jaggery
1 teaspoon of each – coriander seeds (dhania), cumin and red chilli powder
½ teaspoon of salt or to taste
Grind them to smooth paste by adding about one cup of water.

Simmer:
Add the sesame-dalia paste to the curry. Stir in half teaspoon of turmeric. Mix and on medium heat, simmer for about 15 to 20 minutes, until the curry reaches the consistency you desire.
Tastes great with chapatis/naans and with sorghum rotis.

Bottle gourd curry with chapatis

Posted by Indira©Copyrighted in Chana Dal-Roasted (Dalia),Jaggery,Sesame Seeds,Sorakaya(Dudhi,Lauki) (Tuesday July 18, 2006 at 7:21 pm- permalink)
Comments (15)

The New Home of Mahanandi: www.themahanandi.org

Stuffed Bell Peppers (Capsicums)

Capsicum (Bell Pepper)

Hollywood often portrays the pretty blonds as cute and dumb. The same role in vegetable world is filled by bell peppers or capsicums. I think.

Bell peppers are colorful! Look so pretty, cute and also would bring that much needed (in some eyes) color and attraction when added to a dish. They are popular mainly for that reason and they have hollow insides, giving the impression of empty pretty heads just like the blond stereotype. No wonder we are tempted to fill them up. Almost every cuisine has several stuffed recipes for bell peppers. Rice, meat, lentils, nuts and cheese, every other thing in food world is used to stuff the bell peppers. Even other vegetables,… aah, the humiliation. The bell peppers must feel mortified when we fill them up with other veggies. But graceful they are, they won’t show it. They stand our mistreat and still look pretty. Such graciousness always invites strong reaction; people would hate or love them. But few could resist their charms.

One such charming, capsicum recipe is from India. Here the bell peppers are stuffed with spiced mashed potatoes and cooked to brown and then placed in peanut-sesame sauce. Served with rice or chapati, this is a meal fit for a rani (queen). Though the recipe makes us work like kitchen helpers in a rani’s kitchen, once you wipe off the sweat from the brow, once it’s plated, you would feel like a rani. Worth the effort, that’s what I am saying.:)


Capsicums Stuffed With Potato Curry – Ready For Browning

Recipe:

Potato Stuffing:
Good quality potatoes (red or baby alu) – 3 or 6, Pressure-cook or boil them in water, until tender. Remove the skins, mash them to smooth paste.
In a pan, heat a teaspoon of oil, do the tadka (toast ¼ tsp each – mustard seeds, cumin and curry leaves). Saute finely chopped pieces of one onion, 4 green chillies and a fistful of fresh peas. Add the mashed potato. Stir in salt, turmeric and one teaspoon of clove-cinnamon-cumin-coriander seed powder (garam masala). Mix them all well. Cook covered on medium-low heat for about 10 to 15 minutes – That’s our potato stuffing for bell peppers.

Bell peppers (Capsicums):
Pick 6 small sized, fresh and firm bell peppers – any color (green, red, yellow or orange) or color combination is fine. This curry is all about appearance and size matters. Small sized capsicums are perfect for this curry. Jumbo regular grocery (US) type are too big and the curry won’t look good when prepared with them. (Local farmers markets here in US, often carry small sized ones during summer time.)

Cut the tops off. Remove the seeds and membranes inside and make a hollow. Fill them up with potato curry to the top.

In a big iron skillet, heat about 1 tablespoon of peanut oil. Place the stuffed bell peppers neatly in a circle and cook them covered on medium heat for about 15 to 20 minutes. Turn them to sides in-between so that they could get brown evenly on all sides. (You could also cook these stuffed bell peppers in oven – baking and broiling at 375 F until they are soft and tender to touch.)


Stuffed and Cooked Capsicums in Peanut-Sesame Sauce

Peanut-Sesame Sauce:
Toast quarter cup each – peanuts and sesame seeds to golden color. Take them in a grinder, add 2 cloves and 2 one-inch pieces of cinnamon, half teaspoon each – chilli powder and salt and a tablespoon of tamarind juice and powdered jaggery . Grind them to smooth paste.

Heat a teaspoon of peanut oil in a big pan. Add the peanut-sesame sauce and about a half cup to one cup of water. Mix well. Simmer on medium heat for about 10 minutes. Have a taste and adjust salt, sweet and sour levels to your liking.

Add the stuffed capsicums to the thickened sauce. Cook for another 10 minutes on medium heat, covered. Serve with rice or with chapatis.


Stuffed Capsicum Curry with Rice

Notes:
Traditional North- Indian recipe does not inlclude the gravy, and cooking the stuffed peppers in peanut-sesame sauce is my version. Adding little bit Andhra touch.

Posted by Indira©Copyrighted in Bell Pepper,Peanuts,Sesame Seeds (Monday July 17, 2006 at 2:04 pm- permalink)
Comments (36)

The New Home of Mahanandi: www.themahanandi.org

Sunnundalu(Urad Dal Laddu)~Indian Sweets 101

Sunniundalu

When Sailaja of Sailu’s Food selected dals to feature this month’s Jihva For Ingredients, I was ecstatic. The one and only ingredient that truly represents India is the variety of dals, in my opinion. There are rice states and there are wheat states, but common to all 28 states in India are dals. Each state has dazzling array of dal dishes both sweet and savory. Menus always include dal dishes for everyday, for celebrations and as well as for festivals. Even in a foreign land, our meals always would include dals in one way or other. It’s not stretching the truth, when I say dal dishes are the true heart and soul food of India.

By the way, if you haven’t been to Sailaja’s blog already, please go visit now. She blogs from calm, coastal city of Vishakapatnam by the Bay of Bengal, from my home state Andhra Pradesh. Her recipes are visual delight and pure gold. Whenever I visit her blog, I feel happy to see her creations and also feel nostalgic about what I am missing being away from home.

As an entry to JFI~Dals, I have prepared Sunniundalu, a traditional Andhra sweet. Roasted urad dal is ground with sugar into super fine sand like powder, mixed with pure ghee, and the mixture is shaped into round balls. This sweet is much beloved because of its unique taste and nutritional value. These are often prepared for special occasions like baby showers (srimantham) etc., I am so happy that I am able to recreate this favorite sweet of mine for JFI, an event created to celebrate the natural ingredients.

Recipe:
(for 15 medium-sized laddus)

3 cups of whole urad dal – roasted to golden color slowly and on low heat, continuously stirring in a big iron skillet
1½ cups of sugar
1 cup of melted ghee at room temperature
For grinding – esirayyi (grain mill) or Food processor
How this sweet tastes, 50 percent, depends on grinding method. Old world stone grain-grinder is the traditional method of choice. High powered, sharp bladed, food processor comes close. Whatever machine/method you use, the end product must be like fine sand.

Whole urad dal - Roasted to light gold color
Whole urad dal – Roasted to light gold color

Grinding urad dal and sugar to superfine sand like powder using a grain mill

Adding melted ghee to the urad dal-sugar powder

Urad dal-sugar powder and ghee mixture being made into laddus
Urad dal-sugar powder and ghee mixture being made into laddus.

Sunnundalu
Indian Sweets 101 ~ Sunnundalu for JFI-Dals

Many thanks to Sailaja for hosting this month’s Jihva For Ingredients. I am sure the roundup of this event is going to be spectacular. The entries that I have seen so far – Munthirikkotthu (Sweet Moong Dal Balls), Dal Podi Sushi Roll (Indianized Sushi roll), Mid-Eastern Mujadarah (rice-lentil dish) and Azuki paste ravioli in caramel sauce make this obvious. Have a fun and happy dal day on this July 4th weekend, everyone!

Notes:
Grain mill brand Name: PORKERT’s Kitchen Grinding Mill, Type 150
Purchased at a clearance sale from Tuesday Morning.
Sailu’s Sunnundalu – Link

Posted by Indira©Copyrighted in Amma & Authentic Andhra,Ghee,Indian Sweets 101,Jihva For Ingredients,Mitai,Sugar,Urad Dal (Washed) (Saturday July 1, 2006 at 12:02 am- permalink)
Comments (53)

The New Home of Mahanandi: www.themahanandi.org

Pongal (Pongali)

Rice, Roasted Yellow Moong Dal, Roasted Cashews, Cumin and Peppercorn
Sona Masuri Rice, Roasted Yellow Moong Dal, Roasted Cashews, Cumin and Peppercorn

Some foods are simply divine, pongal belongs to that category. There isn’t anything quite like pongal! Creamy and luxurious rice dish that you get by cooking rice with toasted moong dal in little bit of ghee. Lots of water, sometimes milk is added and seasoned with cumin, black peppercorn and salt. The whole mix is cooked in a big pot until the rice and dal are soft. Roasted cashews are sprinkled at the end. This simple dish is so fragrant, the whole house will be filled with wonderful aroma. And the taste, I won’t gush but I will say this; it’s often prepared and offered to Gods in temples. Can we, mere mortals resist the pongal temptation? I don’t think so!

Pittsburgh’s Sri Venkateswara Temple serves the best pongal I have ever tasted out side India. At the temple’s kitchen, the chef prepares pongal in a big caldron following the traditional method. The secret is not only quality ingredients but also the method of cooking, no pressure-cookers there. I think that’s why temple pongal tastes so good. Since last year I have been preparing pongal in a big pot and stopped cooking it in pressure cooker. The difference in taste is tremendous and surprisingly the preparation is also easy.

Here is my recipe:
(for two)

1½ cup rice (preferably Sona Masuri)
1 cup yellow moong dal
2 tablespoon of ghee
1 tsp of cumin
½ tsp of black peppercorn
1 tsp of salt
½ cup of cashews
7 cups of water and
I also add 2 cups of milk (my preference and optional)
A big sturdy pot (Big sauce pan)


Pongal – Starting Point


Pongal – After 15 minutes of cooking


Pongal – at 20 minutes of cooking

1. Heat a teaspoon of ghee in an iron skillet on medium heat. Add and roast moong dal to golden color, constantly mixing. Take care not to black. Remove them to a plate. In the same skillet heat another teaspoon of ghee. Add and roast cashews to golden.

2. In a big sturdy pot, heat a tablespoon of ghee. Add and toast cumin and black peppercorn for few minutes. Stir in the toasted moong dal and rice. Mix them with ghee for few minutes. Pour water and milk and stir in salt. Cover the pot with lid and cook on high heat. Within 10 to 15 minutes, you will see the water gurgling and trying to lift the pot lid. At this stage, remove the lid. Mix the cooking mixture once and partially cover the pot with lid, leaving little bit of gap for water vapor to escape.

3. Within 5 minutes, you will see whole thing coming together. Rice-dal mixture will be doubled in volume. Each grain will be plumped but not broken open. Turn off the heat, and stir in roasted cashews. Close the lid fully and let the rice sit for about 10 minutes. At this stage, you can stir in more ghee if you want to and also add salt to suit your taste.

Rice-dal mixture absorbs the remaining water-milk liquid and becomes little bit tight. Pongal’s consistency can vary from something resembling a thick soup to a creamy porridge, but never like a tight hard ball. Resist the temptation to overcook and turn off heat early.

Usually we will have this pongal with chutney, potato kurma or with a cup of yogurt depending on the time of the day.


Pongal with Coconut Chutney ~ Traditional Indian breakfast
My first entry to JFI – Dal hosted by Sailu of Sailu’s Food and also to Paz’s For the Love of Rice


Along with cumin and black peppercorn, curry leaves are also added to the ghee. I didn’t have any curry leaves when I prepared this recipe so the omission.

Posted by Indira©Copyrighted in Amma & Authentic Andhra,Biyyamu (Rice),Cashews,Moong Dal (Washed),Sona Masuri Rice (Thursday June 29, 2006 at 1:46 pm- permalink)
Comments (41)

The New Home of Mahanandi: www.themahanandi.org

Spinach ~ Garlic Dal (Palakura~Vellulli Pappu)

Toor dal and spinach – no onions but lots of roasted garlic makes this dal unique. You may already know, spinach and garlic make a great combination. In this recipe, garlic is finely chopped and roasted to gold color. Cooking in this manner completely changes the character of the garlic. The garlicy smell disappears and what standouts is the mellow sweet and cashew nut like taste, giving the spinach dal a flavorful boost.

Preparation is 3-step process. (1) Cook toor dal until it falls apart (2) saute garlic and spinach (3) mix cooked toor dal and spinach-garlic. Add seasoning and simmer the whole combination for few minutes.

Recipe:

Pressure-Cook:
½ cup of toor dal and half teaspoon of turmeric in 1 cup of water
Cook the dal until it falls apart
Mash the dal to smooth paste using a wood masher and keep it aside

Meanwhile Prep Work:
1 bunch of spinach – cut into small pieces
1 small whole bulb of garlic – peel and chop garlic into small pieces
4 dried red chillies – cut them into small pieces
Soak marble-sized tamarind in half-cup of water for juice

Do the Tadka:
Heat a tablespoon of peanut oil in a big saucepan. Add and toast:
Dried red chilli pieces
Few pieces of curry leaves
One teaspoon of each – cumin and mustard seeds

Saute:
Stir in garlic. Saute to until golden. Take care not to burn.
Add the finely chopped spinach and saute until the leaves wilt and come together

Stir in and Simmer:
Stir in smoothly mashed toor dal to this sauteed spinach-garlic mixture
Add a tablespoon of tamarind juice, also half teaspoon each of – chilli powder and salt or to taste.
Stir to combine. If the dal is too tight, add about half cup of water.
Mix; close the lid and simmer for about 15 minutes on low heat.

Serve hot with ghee and rice for a great satisfying meal.

Spinach-Garlic Dal with Rice
Pickle, Rice, Spinach-Garlic Dal and Ghee – Meal Today

Recipe Source: Amma, Nandyala

Posted by Indira©Copyrighted in Amma & Authentic Andhra,Garlic (Vellulli),Spinach,Toor Dal (Monday June 26, 2006 at 1:34 pm- permalink)
Comments (41)

The New Home of Mahanandi: www.themahanandi.org

Toor Dal (Kandi Pappu)

Toor Dal (Kandi Pappu)
Dal For Life ~ Toor Dal (Kandi Pappu)
Preparing For JFI ~ Dal on July 1st and For This Week’s Indian Kitchen

Dal with lots of ghee, simple plain dal, dal in rasam and sambhar – homesick or tired of home, feeling indulgent or not feeling well – for every mood and for every occasion, Toor dal is ‘the dal’ for us at least 300 days out of 365 days of a year.

After rice, toor dal is the most important food ingredient we, Andhra log would have in our homes. Our parents, their parents, for all of us, the building bone is toor dal protein. We may move to different countries, talk or think in different language, one thing that’s going to be a constant in our lives foodwise is toor dal.

The light golden color, the way they cook easily, their taste – smooth and unique, the way they would fill us up without making us sweat and make us feel satisfied without being overwhelming. I love everything about toor dal. I confess I am a dal fiend and a toor dal addict. I am sure millions of other Bharat vaasi are also passionate about this dal just like me.

Posted by Indira©Copyrighted in Amma & Authentic Andhra,Indian Ingredients,Indian Kitchen,The Essentials,Toor Dal (Sunday June 25, 2006 at 6:42 pm- permalink)
Comments (9)

The New Home of Mahanandi: www.themahanandi.org

Soymilk Skin (Fresh Yuba) ~ Savory & Sweet


Fresh Soymilk Skin (Fresh Yuba, Uba, Bean Curd Skin, Fuzhu, Foo Pi)

Few months ago, after much hesitation I dared and prepared soy milk at home. The milk was alright, but what I liked most was the skins that would form while boiling soymilk. Do you remember from India, when you boil cows/buffalo’s milk, a thick layer of skin would form on top of boiled milk. You can just lift the layer and eat – Milk meegada or malai, do you remember the taste? Mildly sweet and irresistible because of limited amount. Same thing here with soymilk.

Soymilk skins are much thicker, almost like samosa/wonton wraps. They taste sweet and have a distinct soy smell. What I gathered from the web is that Japanese call this soymilk skin “Yuba” and they are an expensive delicacy. Famously and religiously prepared by Buddhist Monks and used in several Buddhist recipes for its protein richness.

I wanted to try an Indianised yuba recipes and prepared two entries with soymilk skins. A savory and a sweet – Yuba:Potato Curry Rounds and Soymilk Halwa. As entries to IMBB+SHF ~ Soy, hosted by Reid of Ono Kine Grindz. Started the whole process first by preparing fresh soymilk. And then boiled the milk for about an hour. Constantly picking up the milk skins with a chopstick. I wrapped these milk skins around the potato curry and sauteed them for few minutes. With leftover soymilk skins and soymilk, I prepared halwa by adding sugar, finely chopped dates and freshly grated coconut. Simmered the whole thing until it came together like pala kova. Removed to a box and kept it in the freezer to make the halwa little bit firm.

Both the yuba-potato rounds and soymilk halwa tasted superb. Time consuming but worth my effort and I am glad that I tried this ancient classic Buddhist delicacy.

Here is the whole process in images. Enjoy!


Boiling homemade soymilk to pickup soymilk skins (Yuba, Milk Meegada)


Wrapping Potato curry in soymilk skins (Yuba, Milk Meegada)


Sauteing the Soymilk skin (yuba) wrapped potato curry rounds on low heat


Golden colored yuba-potato curry rounds – in closeup


Yuba-Potato Curry Round in fresh soymilk skin (soy paala meegada) with red chilli-garlic powder as garnish


Soymilk Halwa with dates and fresh coconut


More about YubaHere and from Egullet
Yuba making – in images
Tags: +

Posted by Indira©Copyrighted in Dates (kharjuram),Potato,Soy (Tofu, Yuba),Sugar (Friday June 23, 2006 at 9:33 am- permalink)
Comments (49)

The New Home of Mahanandi: www.themahanandi.org

Red Bell Pepper Chutney

Red Bell Pepper Chutney

Of all different colored bell peppers, I like the red ones. Red bell peppers are matured green bell peppers and when bell pepper ages, not only the color but the flavor also changes. They become sweet, which is a surprise. Usually maturing into red signals the more fierce kind of flavor in vegetables, but here they mellow.

This favorite chutney of mine is prepared by roasting red bell peppers, onion and dried red chillies and by blending them including peanuts, jaggery and tamarind juice. The result is one of the flavorful and easiest Bharath-inspired chutnies you will ever try. Tastes superb with all the breakfast items, like idly, dosa, upma and also with rice, chapati or as a spread and dip for snack items.

Red Bell Peppers, Onion, Garlic, Dried Red Chillies, Roasted Peanuts, Tamarind and Jaggery - Ingredients for Red Bell Pepper Chutney

Recipe:

Cut to big chunks:
2 big red bell peppers
1 medium sized onion
6-8 dried red chillies
2 garlic cloves

Roast:
Heat about 1 to 2 tablespoons of peanut oil in a skillet.
Add and roast the cut vegetables and dried red chillies on high heat. The vegetables should be very well browned and soft. Remove them from heat and allow to cool.

Meanwhile, Soak tamarind, and Roast Peanuts:
– Small Lime sized tamarind in half-cup of warm water for about 10 minutes. Or microwave for 30 seconds – This is to soften the tamarind, so it can grind well.
– Roast half-cup of peanuts until golden and remove skins. Store-bought un-salted, roasted peanuts are fine too.

Blend, in a blender or in a mortar using a pestle:
All the roasted vegetables
Tamarind, along with the water it soaked in.
Half cup of roasted peanuts
½ tablespoon of powdered jaggery
¼ tsp of salt or to taste
Grind them together to coarse puree, without adding any extra water.

Remove to a cup and serve with your favorite breakfast/lunch/supper items.

Red Bell Pepper Chutney and Besan Dosas
Besan Dosa and Red Bell Pepper Chutney

Recipe Source: My own creation

Posted by Indira©Copyrighted in Bell Pepper,Dried Red Chillies,Peanuts,Peppers (Tuesday June 20, 2006 at 9:21 am- permalink)
Comments (54)

The New Home of Mahanandi: www.themahanandi.org

Moong Dal Payasam (Pesara Pappu Payasam)

A Cup of Moong dal Payasam
A Cup of Moong dal Payasam for Indian Sweets~101

If I have to choose between a cup of payasam and a slice of cake, I’d always go for the cup. Here, mothers prepare cakes lovingly; back in India, payasams are the norm. Every Saturday my mother would prepare payasam for puja naivedyam. I believe she prepared payasam mainly because of us, four little darlings:), who would come home from school hungry for something sweet. We had half-day school on Saturdays and afternoon meals at my mother’s home always included a type of payasam. Creamy rich with full of cashews and golden raisins, it was like spoonful of heaven on a warm afternoon.

Together between my mom and mother-in-law, there are recipes for at least a dozen different payasams. Who would really need a cook book when you have this type of rich resource right a phone call away? Because they all follow a basic method, it’s not that difficult to remember the procedure. Moong dal payasam is one such easy recipe I picked up from the family.

Moong dal is cooked in sweetened and thickened, rich poppy seed milk. Light golden hue, incredible, inviting aroma and delight to the senses – this is how I would describe this payasam.


Roasted in Ghee – Yellow Moong Dal

Recipe:

Moong dal, yellow (pesara pappu) – 1 cup
Sugar – 1 cup
Milk – 5 cups
Poppy seeds (Khus-khus, gasa gasalu) – ¼ cup
(Soaked in ½ cup of warm water for at least half an hour, to soften them)
Cashews and Golden Raisins, each – ¼ cup
Cardamom (Elachi, aluka) – 6
Ghee (neyyi) – 2 tablespoons

Prep Work:

1 In an iron skillet or tava, heat a teaspoon of ghee on medium heat. Add and roast, yellow moong dal until the color changes from yellow to light red and releases the wonderful fragrance. Remove them to a plate. Aromatherapy starts with this first step.

2 In the same iron skillet or tava, heat a tablespoon of ghee on medium heat. When it is hot, add and toast first golden raisins and then cashews. Golden Raisins puff up like little gold balloons and cashews turn from creamy white to light gold. Take care not to burn. Remove them to a plate.

3 Powder cardamom seeds to smooth powder in a mortar using the pestle or in a spice grinder.

Toasted in Ghee - Cashews and Golden Raisins
Toasted in Ghee – Cashews and Golden Raisins

In a pressure cooker, take roasted moong dal, sugar, milk and soaked poppy seeds along with the water it’s soaked in. Mix and close the lid. Pressure cook until two whistles. Once all the valve pressure is released, remove the lid and with a wood-masher or immersion blender lightly mash the dal. Pressure-cooking is my method; I follow it mainly for the convenience of not stirring and for the speed. In actual recipe, they would take all the ingredients in a wide, thick-bottomed vessel and cook until the dal reaches fall-apart stage. If you don’t have a pressure cooker at home, then follow the second method. It may take little bit more time, but the end result will be worth the trouble, I promise.

Add the toasted cashews and golden raisins along with the ghee they toasted in. Also stir in the cardamom powder to the cooked payasam. Have a taste and add sugar and milk, if needed. Simmer the payasam on medium-low heat about 20 to 30 minutes, until it reaches thick, creamy consistency. Serve warm or cold.


A Cup of Moong Dal Payasam with Poppy Seeds, Cashews and Golden Raisins

Poppy seeds can block the cooker nozzle and that may create a mess, if they not soaked in warm water beforehand. Soak poppy seeds in water first, if you are to cook this in a pressure cooker.
Chana Dal Payasam – Link

Posted by Indira©Copyrighted in Amma & Authentic Andhra,Indian Sweets 101,Milk,Moong Dal (Washed),Naivedyam(Festival Sweets),Poppy Seeds,Sugar (Friday June 9, 2006 at 8:31 pm- permalink)
Comments (45)

The New Home of Mahanandi: www.themahanandi.org

Moong Bean Salad (Pesara Guggullu)

Moong bean Salad (Pesara Guggullu)

Moong bean guggullu or salad was our after-school snack at least once a week when we were children. One cup of this guggullu (salad) and one cup of tea, we would be set until dinnertime 8pm.

And now, I often prepare them at home for light lunch. This traditional Indian salad is filling, nutritious (good protein and Folate content), and can be prepared within 10 minutes, with some preplanning.

Moong Beans, Onion, Green Chilli and Freshly Grated Coconut

Ingredients:
1 cup of moong beans
(Soaked in water for 2 hours and simmered in salted water until tender)
1 onion and 2 green chillies – finely chopped
1 tablespoon of freshly grated coconut
1 teaspoon of ghee or peanut oil
Salt, turmeric and cilantro to taste
Saut? finely chopped onions and green chillies for few minutes, stir in simmered moong beans and seasoning- fresh grated coconut, salt and turmeric. Mix and cook covered for about 5 minutes. Sprinkle some fresh cilantro and serve.

Posted by Indira©Copyrighted in Amma & Authentic Andhra,Moong Dal (whole) (Thursday June 8, 2006 at 9:21 am- permalink)
Comments (20)

The New Home of Mahanandi: www.themahanandi.org

Baingan Chole (Eggplant-Chickpeas)

Baingan Chole and Chapatis
Baingan Chole with Chapatis

Hummus and baba ghanoush got together and baingan chole is born. In plain language, chickpeas and eggplant are cooked together with super fabulous results for a Punjabi style chole. Recipe is simple and almost same as chole preparation.

Recipe:
Soak, Cook and Puree:
– Soak 2 cups of chickpeas in water, overnight.
– At morning, pressure-cook chickpeas in enough water until the chickpeas are tender, but not mushy.
– Drain Water. Separate half cup of chickpeas and puree them into smooth paste. Keep the remaining aside.

Eggplant
Jumbo (Italian) Eggplant

Cut, Chop and Prepare Masala:
– Wash and cut big eggplant into bite sized cubes.
– Chop 1 onion and 2 tomatoes into small pieces.
– Make a smooth paste of 2 garlic, few springs of fresh cilantro and small piece of ginger.(GGC Paste)
– Prepare one tablespoon of cloves-cinnamon-cumin-coriander seed powder. (CCCC Powder)

Saute, Stir-in and Cook:
– Heat one teaspoon of peanut oil in a big pan. Do the popu or tadka.
– Add and saute onion, tomatoes, GGC paste, CCCC powder and eggplant cubes, in that order.
– Add the pureed chickpea paste and pressure-cooked chickpeas.
– Stir in 2 cups of water, one teaspoon of each – salt, red chilli powder, amchur powder and turmeric.
– Close the lid and cook on medium heat for about 20 to 30 minutes, stirring in-between.
– Serve warm with chapatis or with rice.

Lunch Scene at Singari's Home - Cartoon
Lunch Scene at Singari’s Home

Posted by Indira©Copyrighted in Chickpeas,Eggplant (Tuesday May 9, 2006 at 2:45 pm- permalink)
Comments (37)

The New Home of Mahanandi: www.themahanandi.org

Moong Bean-Plantain Curry

Did you see Stephen Colbert on C-span’s televised Correspondents’ Dinner, last Sunday night? His comedy skit was breathtaking in its boldness. Charming, clear and ironically straightforward – his comic delivery was a sight to behold. Finally it took a pretend journalist to state the obvious – the little emperor has no clothes and of course that made the ‘real’ journalists and the guest of honor spitting mad. If you enjoy political satire or like Colbert style, don’t miss out his stellar performance and checkout this site for transcript and video link. One has to admire his chutzpah.

Coming back to cooking, here is a traditional recipe where plantain and moong beans are cooked together in water and seasoned with green chilli-coconut paste. Rural in origin and often served with sorghum roti, this favorite curry of mine is a hearty, flavorful and filling meal, also one of the ways that I cook plantains aka green bananas.

Plantain cut into cubes, Moong beans soaked, green chilli-coconut paste
Presoaked Whole Moong Beans, Green Chilli-Coconut Paste and Plantain cubes

Recipe:

1 plantain (green banana), peeled and cubed
2 cups of presoaked whole moong beans (soaked in water overnight)
6-8 green chillies
1 tablespoon of finely sliced fresh coconut
¼ teaspoon of turmeric
½ to 1 teaspoon of salt
For popu
1 tsp of mustard seeds, cumin, few pieces of dried red chilli and curry leaves

Take the presoaked whole moong beans, about 2 cups in a big vessel. Add 4 cups of water, quarter teaspoon of salt and cook them covered on medium-high heat for about 15 minutes undisturbed. Presoaked moong beans cook easily and can be done without using the pressure-cooker. It tastes somuch better cooked in this old style. Meanwhile do the prep work. Peel and cut plantain and make a smooth paste of green chillies-coconut.

After 15 minutes of cooking, check the moong beans. They must be tender by now. Add plantain cubes, turmeric and also water if needed. Cover and cook them on medium heat again for another 10 minutes. Plantains cook fast unlike potatoes and by the end 10 to 15 minutes of cooking, plantain cubes will be tender and the moong beans will be falling apart. That’s what we want. At this stage, stir in green chilli-coconut paste and cook for another 5 minutes.

Just before turning off the heat, heat a teaspoon of peanut oil in small vessel, add and toast the popu or tadka ingredients. Add this to the curry and stir. Turn off the heat. Serve and enjoy the best tasting curry, the kind you’d find in a humble Indian home (never in a restaurant). Usually served with chapati, sorghum roti or with rice.

Moong Bean-Plantain Curry with Chapatis
Moong Bean-Plantain Curry with Chapatis ~ Our Simple Lunch

Kitchen Notes:
Prepare the curry little bit on the watery side.
The gravy of this curry comes from watery, overcooked moong beans and the greenchilli-coconut paste.
I’ve also added one banana pepper to this curry.

Posted by Indira©Copyrighted in Arati Kaaya (Plantain),Moong Dal (whole) (Friday May 5, 2006 at 1:48 pm- permalink)
Comments (29)

The New Home of Mahanandi: www.themahanandi.org

« Next PagePrevious Page »