Mahanandi

Living in Consciousness ~ Indi(r)a’s Food and Garden Weblog

Wild Rice with Eggplant-Chole

First time I tasted wild rice was at a restaurant in Houston. For main course there was an entry with wild rice. I’ve heard good things about wild rice and I wanted to give it a try. Try we did. The restaurant version of wild rice was full of butter and had some toasted pine nuts. The portion was small, but we loved it so much, decided to cook it at home. Then we found about the price; wild rice is not cheap, I can tell you that. It’s an indulgence for us and I like to cook it once in a while.

My version is very simple. For 1 cup of wild rice, usually I’d add 2 and half cups water, a quarter teaspoon of salt and ghee. I cook it just like regular rice in a rice cooker. The result is very fabulous, nutty, chewy wild rice. Though it looks like ‘Basmati gone black’, the taste of wild rice is unique. It has its own unique smell and texture. You can’t gobble up, each grain beckons you to slow down and enjoy it. Try it, if you haven’t already.

Wild Rice with Eggplant-Chickpea Curry (Brinjal-Chole)
Wild Rice with Eggplant Chole ~ Our simple lunch today.

Eggplant Chole: Recipe Replace aloo (potatoes), with jumbo eggplant cubes. I’ve got the idea of cooking eggplant-chickpeas together from Mika’s blog.
Wild Rice Nutritional information – click here.

Posted by Indira©Copyrighted in Biyyamu (Rice),Chickpeas,Eggplant,Wild Rice (Friday April 14, 2006 at 3:10 pm- permalink)
Comments (14)

The New Home of Mahanandi: www.themahanandi.org

Colorful Idly with Carrots & Chana Dal

Back home, a breakfast is still a breakfast. It is not brunch, lunch or supper. Breakfast items are few, and everyday one of them is prepared and eaten by 9 AM. My mother never uttered the words – “I’m not feeling well today and not making any breakfast for you”. As a grown up, living in a silent world with plenty of time to reflect back, now I realise, my mother like me, must had several reasons to slack off, if she wanted to. But she never did. I am sure many of you can relate to what I am talking about. That kind of devotion was given to us when we were children. This is the reason why I often mention ‘amma (mother)’ as recipe source. If I have the courtesy to write a cookbook author’s name as recipe source for a blogged recipe, why shouldn’t I return the same courtesy to amma, from whom I learned most of my cooking from.

Colorful idly with carrots and chana dal aka masala idly is one of her recipes. Finely grated carrots and chana dal along with green chillies and cumin etc. are added to the leftover idly batter for a next day morning breakfast. Imagine the taste of upma, and these idlies almost taste like that. Steam cooked in round shape, they are a pleasure when served hot with chutney and sambar. Though they are a breakfast item back home, here I often make them on a weekend for brunch, lunch or for supper.

Idly plates filled with idly batter - ready for steaming

Recipe:
This is same as idly preparation except that we add bunch of other ingredients and change the lilly white, cloud like plain idlies into colorful, somewhat dense masala idlies.

(for 16 idlies)
3 cups of Idly batter
(urad dal and rice ravva(cream of rice) in 1:2 ratio, soaked, grind into smooth batter and kept overnight for fermentation)
Ingredients to add to idly batter
1 cup of grated carrot (1 big carrot)
¼ cup of chana dal (soaked in water for atleast an hour)
¼ cup of coarsely crushed, roasted peanuts or cashews
¼ cup of finely chopped cilantro
2 to 4 finely chopped or minced green chillies
1 teaspoon of cumin and few curry leaves
¼ teaspoon of salt or to taste

Mix the ingredients with idly batter thoroughly. Fill the round impressions of idly plates with this batter. Place the idly stand in an idly cooker and steam cook them for about 20 minutes or until the batter sets completely. Remove the idly stand from the cooker, run a spoon under each impression and separate the cooked idlies from the impressions. Serve them hot with peanut or coconut chutney and sambhar.

Idlies with veggies, served with peanut chutney, and shallot sambhar
Masala idlies with peanut chutney and shallot sambhar

For more detailed recipe of idly, about idly stand, idly plates and idly cooker etc., – click here

Posted by Indira©Copyrighted in Carrots,Chana Dal,Rice Ravva (Cream of Rice),Urad Dal (Washed) (Tuesday April 11, 2006 at 1:54 pm- permalink)
Comments (25)

The New Home of Mahanandi: www.themahanandi.org

Home Made Soymilk

Homemade Soya Milk

I was looking for recipes to prepare soymilk at home for a while now. The reason ofcourse is the recent pricehike of commercial soymilk. In big warehouse shops like Costco, the price for 3 packets of ‘Silk’ brand soymilk was 4 dollars, few years ago. It is now around 8 dollars. Vijay and I, we both like soymilk – for cereal, for cooking and whenever we feel like drinking something refreshing particularly during summer months. Cold soymilk has been our drink of choice. But now with the recent price increases, I’ve been feeling little reluctant to pay that kind of price, it felt like ‘organic’ kind of ripoff.

That’s when I found this clearly described recipe at fellow foodblogger/chef’s blog “Tasty Bytes” for home made soymilk. I had to give it a try. I brought some books from the library and also googled; what I found out was there are mainly two ways to prepare soymilk.

1.Soybeans are soaked, cooked first & then pureed to extract the milk.
2.Soybeans are soaked, pureed first to extract the milk& then the milk is boiled. (This method is traditional Japanese way of preparing soymilk according to this book.)

I was pendulating which method to follow, because this is my first time preparing at home and I wanted it to be a success taste wise. Well, I left it for Vijay and he chose the second method – Puree, extract and then boil. So last weekend, for the first time, we prepared homemade soymilk. I could not believe how easy it was. The whole thing of extracting the milk took about 30 minutes, that’s all.

What about the taste – we added vanilla and honey for flavoring and tasted the chilled soy milk. It has a strong, more robust flavor than the commercial vanilla soymilk. Not off-putting at all, but again we are motivated to like it :). Adding vanilla and honey was a good choice, because we are accustomed to vanilla flavored, mildly sweet commercial (Silk brand) soymilk. For those of you who ask, why soymilk, what’s so special about it? – We prefer it mainly because it’s a guilt free, hormone and cholesterol free choice we have available here. And soymilk is high in protein and rich in iron but low in sodium, fat and calcium. Also we like it for taste… heavy textured but it has a smooth, silky taste.

Dry Soya Beans, Soaked Soya Beans, Rubbed and skins removed Soya beans
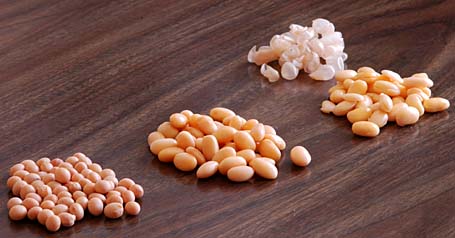
Soybeans – Dry, Soaked, Rubbed and skins removed

Recipe:

2 cups of dried soybeans
4 glasses water
2 tablespoons to ¼ cup of honey(or sweetener of your choice)
1 teaspoon of pure vanilla
Big pot and cheesecloth (gangi gudda/cotton cloth)

Preparation is real simple and 3 steps.
(1) Soak and rub (2) Blend and extract (3) Boil and chill.

Soak and Rub:
Soak the beans overnight in lot of water. They expand considerably, so take a big vessel and add at least two to three glasses of water for them to soak. By Morning, they will double in size. Rub soybeans with hands to remove the outer covering. The flimsy outer covering will easily separate from the beans and will float to the top. With hand, scoop them and remove. Repeat like this, two or three times to remove the covering. I was able to remove the outer layer for at least 75 percent of Soya beans.

Extracted soymilk and the squeezed out bean pulp
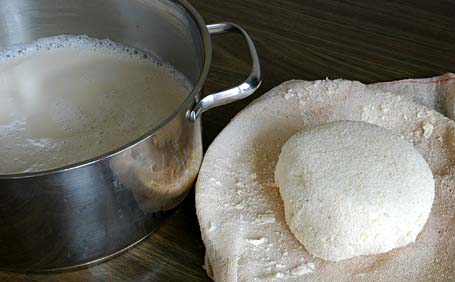
Extracted soymilk and the squeezed out soybean pulp

Blend and Extract:
Pour the beans into a colander to drain the water. Take the beans in a blender and in batches, grind them into smooth puree adding water.

Keep a big pot on the side. Cover it with a cheesecloth or gangi gudda/cotton cloth. Pour the pureed bean mixture into the cloth. Pull the cloth together and twist and allow dripping for few minutes. And then with your hands gently squeeze as much milk as possible. Take care not to squeeze the soya bean pulp.

Do this in batches. I kept the squeezed out soya bean pulp from each batch on a plate. Finally I blended this pulp again two times, adding water, to extract as much soymilk as possible.

Boil and Chill:
Pour the milk through a fine sieve into a big pot. You see white foam (the kind, that forms when you blend urad dal or moong dal) floating on the top of milk. Scoop it with a spoon or with your hand. I did this to clear the surface of milk.

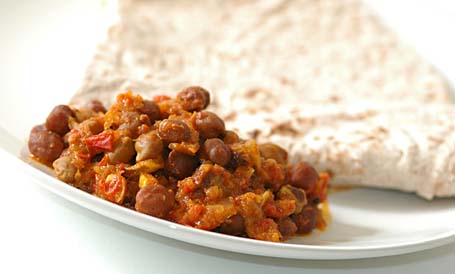
Bring the milk to a boil. Add honey and vanilla. Reduce the heat to medium. Partially covered, simmer it for about 30 minutes, stirring in-between. Just like cows milk, layers of skin (meegada) were forming on top, I removed the skin (meegada) layers to a cup and later added this meegada to the ‘aloo chole’ I was preparing for supper. The meegada skins tasted melting delicious.

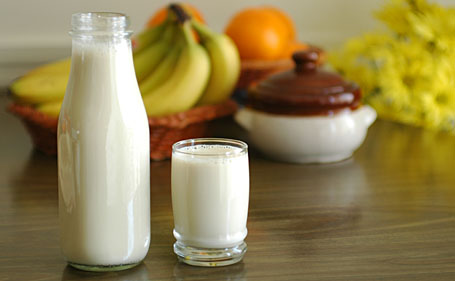
Allow the milk to cool to room temperature. Pour into a clean bottle and keep the bottles in the refrigerator to chill. Serve and enjoy.

Homemade Soya Milk
Home made soymilk – all ready for chilling in the refrigerator.


Caution: Extremely acquired taste.
Recipe Source: Foodblog – Tasty Bytes and Cookbook – “The science and lore of the Kitchen
Yield: 1 liter (quart) or two bottles like in the photo above.

Posted by Indira©Copyrighted in Soy (Tofu, Yuba) (Monday April 3, 2006 at 12:42 pm- permalink)
Comments (72)

The New Home of Mahanandi: www.themahanandi.org

13. Chana Dal Payasam (Sanaga Pappu Payasam)

Yesterday, on Ugadi, the weather was perfect with temperatures around 70 F. It felt like spring and Andhra weather. To celebrate this perfect day on Ugadi, I prepared chana dal payasam (sanaga pappu payasam) for puja.

Payasam is the most common type of dessert served in homes across south India. Prepared with basic ingredients and following a simple method, Payasam– the liquidy dessert, is a people pleaser. Usually the base is a thickened milk and sugar or jaggery syrup. The solid component varies – protein in the form of chana dal or moong dal are added. Or by adding carbos like rice, vermicelli, sabudana and nuts like almonds; different types of payasams are prepared. Real easy and the outcome is always sweet mouthfuls, it is a favorite among children and adults all alike. Here is the recipe for one of my favorite payasams:

Recipe:
(For two)

1 cup chana dal
¼ cup sabudana (Sago, Saggu Biyyam)
separately, soak them in water for at least two hours. Presoaking both chana dal and sabudana (sago) reduces the cooking time, considerably.
For sweet syrup
1 cup of powdered jaggery or sugar
3 cups of milk
Flavoring
1 tablespoon of ghee
¼ cup of cashews and golden raisins
4 cardamom pods – seeds finely powdered

Chana dal, Sabudana (Sago), Milk and Jaggery - Ingredients for Payasam

1. Take chana dal and one cup each of milk and water in a pressure-cooker. Pressure-cook the dal until one whistle, just to soften the chana dal. Do not disintegrate the dal; take care not to over cook.

2. Meanwhile in a thick bottomed, big vessel, take half cup of water. Add sugar or powdered jaggery. Stir and cook, until the sugar/jaggery melts. When the syrup starts to thicken, add the soaked sabudana, and 2 cups of milk. Cook them on medium heat for at least 15 minutes, stirring in between. To this milk-sugar-sabudana syrup, add the contents of the pressure cooker – chana dal and the milky liquid it is cooked. Stir and check the sweetness level, add sugar if needed. Simmer on medium heat, Uncovered, stirring occasionally for another 15 minutes or until it reaches consistency/thickness, you desire. Keep in mind payasam further thickens on cooling.

3. When all this is happening, heat a spoonful of ghee in a small pan. Add and toast – first cashews, then golden raisins until light brown. Add these toasted things along with ghee, to the simmering payasam.

4. Finally stir in powdered cardamom, simmer another 5 minutes. Switch off the heat, cover the pot with a lid and let it sit for at least half an hour. Serve warm or cold.

Golden Raisins fried in ghee, Cashews, Soaked Chana dal, Payasam (Sanaga pappu Payasam)
Chana dal payasam (Sanaga Pappu Payasam) ~ For this week’s Indian sweets 101

Variations:
I also prepare the same payasam with chana dal(bengal gram) without adding the sabudana(sago).
Sometimes, I also add fine semolina instead of sabudana to chana dal payasam.
Toasted fresh coconut gratings are also added along with cashews and golden raisins for that rich nutty sweetness.

Posted by Indira©Copyrighted in Amma & Authentic Andhra,Chana Dal,Indian Sweets 101,Milk,Naivedyam(Festival Sweets) (Friday March 31, 2006 at 1:15 pm- permalink)
Comments (31)

The New Home of Mahanandi: www.themahanandi.org

Maamidikaya Pappu (Mango Dal)

We celebrate Ugadi (New Year) festival on 30th of March this year, and Ugadi is all about mangoes traditionally. Back in India, we decorate our houses with mango leave garlands; at home we prepare recipes with unripe mangoes. You see, by March and April, the bazars are usually flooded with mangoes. First the unripe mangoes in a beautiful shade of pure green, then golden yellow colored ripe mangoes make an appearance at local ‘ritu bazars’ tantalizing the senses. No wonder, we celebrate mango season with a festival.

But here, where I live, green mangoes are hard to come by. I had to travel 100 miles, paid humungous amounts, just because I couldn’t resist a beautiful tradition and I’m very lucky to get them. With the green mangoes I purchased, here is one, an original Andhra recipe – ‘Mango dal’. Green mango cooked with toordal. Little bit tart, fruity with a hint of caramel undertones from mango and earthy nutty smoothness because of toor dal – is a taste that one will never forget.

Green mango, Chilli Powder, Turmeric, Toordal and Onion - Ingredients for Mango dal (Click on the image to get a closer look)

Green mango, Chilli Powder, Turmeric, Toordal and onion – Ingredients for Mango dal

Recipe:

1 green mango
1 medium sized red onion – sliced into big chunks
4 fistfuls of toor dal (¾ cup)
1 teaspoon of chilli powder
¼ teaspoon of turmeric
½ teaspoon of salt or to taste

Popu/Tadka
1 tsp of peanut oil or ghee
1 tsp of each – mustard seeds, cumin, urad dal, chana dal
4 to 6 dried red chilli pieces and curry leaves
2 garlic cloves – finely chopped

1.Wash green mango thoroughly to remove any pesticide sprayings. Dry it with a towel then cut it into small cubes. I don’t like to peel the mango skin for this recipe. The tough outer skin of mango, imparts kind of tarty flavor to the dal, so following the tradition, I keep the skin. Scrape any white flesh attached to the seed with a peeler and then only discard the seed. (see this photo for the stripped seed.)

2. Take toordal, mango, onion, chilli powder and turmeric in a pressure cooker. Add one and half cups of water. Close the lid and pressure cook until 3 whistles or until you are sure the dal is soft and mushy. Turn off the heat and wait for the pressure to go off.

3. After all the valve pressure is released, remove the lid. The contents usually are cooked soft by now, add salt and with a wood masher or whisker, mash the dal, until all the toordal turns into fine mush.

4. In a vessel, heat peanut oil or ghee, Toast the popu ingredients in this order. First add dried red chilli pieces, garlic and chana dal. Then urad dal and curry leaves, finally add and toast cumin and mustard seeds.

5. Remove the mashed mango dal from pressure cooker and add it to the popu in the vessel. Stir to mix and cover the vessel with a lid so that the dal could absorb the flavors of popu

Serve with rice and ghee, a dry sauté curry by the side and some papads for a memorable meal.
My preference: Mix mango dal with rice and ghee thoroughly. Shape the mixture into small rounds and have them with papads preferably sago (sabudana) papad.

Mango dal and rice mudda in a sabudana papad
(Maamidikaya pappannam mudda on a saggubiyyam vadiyam)
Mango dal mixed with rice&ghee. Shaped into round ball & placed on a deep fried sago(sabudana) papad.

For mango dal, we in our homes, use only chilli powder. Do not substitute it with green chillies.
Sago (sabudana) papads are available in Indian grocery shops and green unripe mangoes- during spring and summer seasons.

Posted by Indira©Copyrighted in Amma & Authentic Andhra,Mamidikaya (Green Mango),Toor Dal (Monday March 27, 2006 at 10:45 am- permalink)
Comments (51)

The New Home of Mahanandi: www.themahanandi.org

Masala Dosa

Masala Dosa with Coconut chutney and a cup of sambhar
Masala dosa with coconut chutney and a cup of shallot and carrot sambhar

How can anyone not like dosas? Just one bite, that’s all it takes to fall in love with them. They are such a knockout mini meal any time of the day. I often dream of starting my own franchise here, 🙂 to cater freshly cooked dosas with all kinds of filling inside them. There is one already in New York, New Jersey area, called ‘Dosa Express’, which boasts about 50 different types of dosas – all kinds, from just plain dosa to dosas with variety of fillings, like cheese-potato curry combo etc.,

But if you ask me, nothing can beat the old classic, ‘Masala Dosa’. Crisp dosas filled with spicy powders, onion-red chilli paste and potato curry, if that’s not enough they are served with coconut chutney and a cup of sambhar. Can’t stand on your feet kind of knockout combo. Preparing this type of restaurant dosa at home is really easy, only thing you need is time and some planning.

Recipe:

A thick bottomed, flat, seasoned cast-iron pan
1 cup of rice
½ cup urad dal

Wash and soak rice and dal together in 2 to 3 cups of water for at least 6 hours. Drain and grind them in a blender or wet grinder into a smooth batter. Add little water in-between for smooth grinding, if necessary. The consistency of batter must be like that of evaporated milk (commercial kind). Not too watery or not too thick.

Pour the batter into a big vessel, cover it with a lid and keep it in a warm place for overnight fermentation. By morning the batter will be doubled, usually. Add half teaspoon of salt to the batter and stir thoroughly and the batter is ready for dosas. Place and heat the dosa skillet on the stove and follow the procedure shown in the pictures below.


Season the Dosa skillet with a teaspoon of oil and rub it with a cut onion. Onion not only gives nice flavor to dosa, also seasons the skillet.(this is an oldtime tip)


Pour a ladleful of batter on the skillet. Spread it around with the ladle.


With the ladle, shape and move the batter outwards in concentric circles – until it shapes in a circular, thin round. Sprinkle half teaspoon of peanut oil around the batter. Increase the heat high and cook it for few minutes.


Flip it to other side to cook for few seconds.


Reverse it again and quickly sprinkle some pappula podi(spicy dalia powder), apply red onion-dried red chilli paste around the dosa and then place a general portion of potato curry in the middle.


Fold the dosa in middle, remove and serve it immediately. This whole process must be done in maximum two to three minutes. Hot skillet and fast hand action is necessary and do not keep dosa on skillet for long, it’ll turnout hard and brittle, instead of soft and chewy.

Masala Dosa with Coconut chutney and a cup of sambhar
Masala dosa with coconut chutney & a cup of sambhar ~ Our weekend brunch

Prepared in a style of Udipi restaurant dosa, Nandyala, India.
Potato Curry: Pressure cook/boil potaotoes until tender. Remove the skin, cut or crumble them into bite-sized pieces. Sauté finely chopped onions, green chillies and crumbled potatoes together. Season to taste – potato curry for dosa is ready.
Onion -red chilli paste: Cut one big red onion or 4 to 6 shallots into chunks. Add 6 dried red chillies and quarter teaspoon of salt or to taste, and grind into coarse mixture.
Pappula podi – recipe.
Coconut chutney – recipe.
Sambhar – recipe.

Posted by Indira©Copyrighted in Amma & Authentic Andhra,Sona Masuri Rice,Urad Dal (Washed) (Tuesday March 21, 2006 at 4:53 pm- permalink)
Comments (69)

The New Home of Mahanandi: www.themahanandi.org

Ponganalu (Gunta Pongadalu)

Raayalaseema, Konaseema and Telengaana, these are the three regions in Andhra Pradesh, my home state.

Each region has its own way of cooking things and special recipes. In case of breakfast/brunch worth getting up early for, ‘Konaseema’ is famous for their ‘Pesarattuupmacombination (beautifully put together by Sailu). I’m not that familiar with ‘Telengaana’ cuisine and ‘Raayalaseema’, where I’m from, has few special breakfast dishes unique to our region. One is “buggani” – prepared with puffed rice(murmura), I blogged already, and the other is “ponganalu” – rice lentil batter is seasoned with shallots, green chillies etc., then cooked in round impressions in an iron skillet until golden. These small pretty, dome shaped rounds are usually served with peanut chutney or coconut chutney.

In our homes, whenever relatives from other regions of Andhra or from other states visit us for holidays, out comes the “ponganala Pennam”(ponganala skillet). Round, golden colored ponganalu, hot off from the skillet, always elicits oohh… aahh… from our relatives and from their weird offspring (are there any other kind? :)). Because they are unique to our region, preparing them is our showoff kind of thing, to out of staters who were related to us by marriages etc.,:)

Preparing ponganalu, it’s all in the skillet. Right kind of skillet delivers or breaks a ‘ponganam’. Nothing can beat an old world style, well seasoned iron skillet. They are the best and the place where you can buy is of course India. I’ve seen some non-stick skillets here in US in some Indian shops lately. They are also fine, if you don’t mind the non-stick coating.

Recipe:
For 3 to 4 batches of Ponganalu

Ponganala batter:
1 cup rice
½ cup urad dal

Soak them in water for about 6 hours. Drain (reserve the water) and grind them into smooth batter adding just enough water (add the reserve one, we kept aside). The consistency of the batter must be thick like idli batter or like condensed milk (commercial kind). Take the batter into a big vessel, cover and let it sit overnight for fermentation.
Sour and leftover dosa batter is perfect to prepare ponganalu. If you have some, try ponganalu with it, for a change.

Ingredients to prepare ponganalu

Seasoning (Add to the overnight fermented batter):
1 big red onion or 6 shallots – finely chopped
(Because we mix them in the batter raw, avoid yellow onion for its smell & awful rawtaste)
4 green chillies – finely chopped
Few springs of cilantro – finely chopped
A fistful of chana dal (soaked overnight)
1 teaspoon of cumin
½ teaspoon of turmeric and salt
Add all these ingredients to the batter and mix thoroughly.
Also prepare peanut or coconut chutney.

Cooking: Place the ponganala skillet on medium heat. Add few drops of peanut oil into each impression. With a spoon or with a piece of paper towel, rub oil around, to season the skillet. When the skillet is hot and ready, proceed like this, following the images.


Pour a ladleful of batter into each impression.


Once all impressions are filled, cover the skillet with a lid and cook on medium heat for about 5 minutes undisturbed.


Remove the lid; The batter will be set by now. Gently lift the ponganalu with a “ponganala lifter” or with a spoon. If properly cooked, they should come out easily without sticking to the skillet. If not, cook them for few more minutes.


Turn each one to opposite side to cook.


Cook them another 5 minutes on medium heat undisturbed. Gently lift them from out of the skillet. When properly cooked they should come out easily without sticking to the skillet. If not, cook them for few more minutes. Remove them all onto a plate. Season the skillet with oil, again repeat the steps to cook another batch. Medium heat is the key.(Cooking them on high heat in a hurry or on too low heat won’t work- usually the outcome will be messy ponganalu.)


Ponganalu with peanut chutney – Breakfast worth getting up early for.

Recipe Source & Origin: Amma and Rayalaseema (Andhra, India)
Also checkout ‘Ponganalu’ by Santhi, friendly, fellow Raayalaseema vaasi.

Posted by Indira©Copyrighted in Amma & Authentic Andhra,Sona Masuri Rice,Urad Dal (Washed) (Monday March 20, 2006 at 9:08 am- permalink)
Comments (81)

The New Home of Mahanandi: www.themahanandi.org

Indian Broad Beans Curry (Chikkudu Kaya Kura)

Fresh beans can be exciting, particularly Indian broad beans. Compared to green beans, they have a more prominent beany taste and the seeds inside are plump, meaty and mildly sweet like baby lima beans. Back in Andhra, it is a popular vegetable to grow. Backyards covered with these bean plants provide shelter from the hot sun; they not only enrich the soil with their roots(legumes) and also us – the plump beans are nature’s tiny capsules of proteins. Very nourishing and tasty. You can find Indian broad beans during spring and summer at local Indian grocery shops here in US.

Indian Broad Beans, Chikkudu Kayalu

Recipe:

20 to 25 Indian broad beans (pick plump ones)
2 ripe tomatoes and 1 onion – finely sliced
Make a paste
½ cup of roasted peanuts
1 tablespoon of tamarind juice
2 cloves and 1 small cinnamon stick
½ tsp of chilli powder and salt
¼ tsp of turmeric
1 tablespoon of powdered jaggery
(Take all these in a blender, add half glass of water and puree them to smooth paste)
For Popu or tadka
1 tsp of mustard seeds, cumin, minced garlic and curry leaves

Adding the Indian Broad beans to the curry sauce

Preparation:

Wash the broad beans. Take them in a plate, remove the ends and string them. Just pluck the end of a bean with your hand, and then pull downward; if a thick thread comes away, the bean need stringing, so do the same on the other side. The beans can then be sliced either using a sharp knife or with your hands. Cut or pluck them into small pieces.

Heat one teaspoon of peanut oil in a big pan. Add and toast mustard seeds, cumin, minced garlic and curry leaves. Add and saute onions and then tomatoes. When they are softened, add the cut broad beans. Stir in peanut-tamarind paste and another half to one glass of water. Cook them covered, stirring in between, on medium heat for about 15 to 20 minutes or until the beans are properly cooked. Have a taste and add salt and jaggery if needed.

Serve warm with rice or chapati and enjoy this classic sweet and sour, nutty and beany, Andhra curry.

Chikkudu Kaya Kura and Annam(Indian Broadbean curry and rice) - Our lunch today
Indian Broad bean curry and rice (Chikkudu kaaya kura and Annam) ~ Our lunch

Recipe Source:Amma

Posted by Indira©Copyrighted in Amma & Authentic Andhra,Chikkudu Kaya (BroadBeans),Peanuts (Tuesday March 7, 2006 at 1:57 pm- permalink)
Comments (25)

The New Home of Mahanandi: www.themahanandi.org

Cornmeal-Cabbage Muffins

Williams-Sonoma, the kitchenware shop that sells quality kitchen stuff, has a series of cook books – Like their shop, the cookbooks are very clean, organized, not a lot of recipes, but have an excellent presentation and gorgeous photos. The book size is not too big, not too small; they are like short notebooks with color photo on every page. Each book focuses on one topic. So far, Cookies, Cakes, Muffins, Breads and Risotto – these are the cookbooks, I borrowed from my local library and flicked through. More than anything, they are eye candy.

Williams-Sonoma

Stephanie of Dispensing Happiness, my blog friend is blogging recipes from ‘Muffins‘ cookbook. When she mentioned last week that she was going to try cornmeal-jalapeno muffin recipe, I wanted to join in and made a baking date with her. After two renewals and before returning the book to the library, I wanted to try at least one recipe. FInally last weekend, I baked cornmeal muffins from the book.

I followed the recipe mostly and also added some extras, because I was preparing these muffins for our supper. In addition to corn meal, all purpose flour, butter milk and baking powder etc, I have also added cabbage, shallot, chickpeas sauté to the cornmeal dough, so that the muffins baked would be more dinner worthy. They turned out, I can’t say excellent, but acceptable, even after all these extras. I can’t imagine the taste if I tried them bland with only just cornmeal and chillies.

cornmeal-cabbage dough in muffin pan - all ready for baking

Recipe:
(For 11 muffins)

1½ cups of yellow cornmeal
1 cup all purpose flour (maida)
1½ cups of buttermilk
1 tablespoon peanut oil
1 teaspoon of each – salt, sugar and baking powder
Some cheese gratings to top the muffins
Veggies I added
3 cups of finely chopped cabbage (I used red cabbage)
3 shallots and 6 green chillies- finely chopped
½ cup of chickpeas (soaked overnight)

First I sautéed the veggies together for few minutes, until they are cooked. In the meantime, I mixed all other ingredients together thoroughly without any lumps. I stirred in the sautéed veggie mixture to the dough. Greased the muffin pan with little bit of oil, leaving one muffin cup empty and filling it with water to prevent warping (following the book suggestion). Filled the muffin cups with cornmeal-cabbage dough. I also sprinkled cheese on top of some. Baked them in a preheated oven at 400 F (200C) for about 25 minutes, until they are golden.

They tasted like baked versions of cabbage bajjis (you know the kind, bajjis/pakoras – veggies mixed in a gram flour-jowar flour-rice flour dough, then deep fried — almost like that).

Cornmeal Cabbage Muffins - One with cheese sprinkled on top and the other with no cheese topping
Cornmeal-Cabbage Muffins

Recipe Source: Adapted from ‘Williams Sonoma-Muffins’, page 46
Things I skipped adding (from the book’s recipe) are 2 eggs, another 1 ½ tsp of baking powder and more oil – reason for my flat muffin tops.

On a blogging break. See you all in a few days.

Posted by Indira©Copyrighted in All-Purpose Flour(Maida),Cabbage,Chickpeas,Corn Meal,Shallots (Tuesday February 28, 2006 at 2:07 pm- permalink)
Comments (34)

The New Home of Mahanandi: www.themahanandi.org

Idly (Idli, Iddenlu)

Our love for idlis, the soft, fluffy white, round discs made of rice and lentil batter, began when we were children. Two, three year old babies with tiny idlis in their hand, playing around mom, is a common scene you see in many Indian households. As we grow up, the role of idlis also changes – first as toddlers’ teething food, to childhoods play, fun kind of food. Then in teenage years, the kind of breakfast we really enjoy eating without complaining much. Later In twenties and thirties – we try, struggle and wonder how folks back home make those fluffy cloud like visions of idlis so effortlessly. Try as we may, we can’t recreate those beauties here, because the weather, the grain and even the water is different here.

Method of making idlis is very simple yet little bit time consuming, only in the sense that you have to plan ahead. Whether idlies turn out like cotton soft or solid, white round bricks – it all depends on fermentation (that means where you live and how you grind the batter etc.,). Most of the times, the recipe I follow gives good, decent idlis, considering I live in a very cold climate area. See, if my recipe works for you.

Idly stand and idly plates
Idly stand and idly plates, some filled with urad dal– rice ravva batter

Recipe:

Urad dal and rice ravva (cream of rice, rice suji) in a ratio of 1:2
1 tsp of fenugreek seeds
Pinch of baking powder
Utensils
Blender/wet grinder
Idly stand with idly plates (see the photo above)
And a vessel with tight lid (suitable to fit idly stand)

Soak urad dal in just enough water overnight or for at least 4 to 6 hours.
Drain the water and keep the drained water aside.
Grind the dal into silky smooth batter. To get the medium tight consistency, add the drained water kept aside, as needed to the batter,while grinding. Remove the batter in a vessel.
Add rice ravva and mix thoroughly without any lumps.
Keep it covered, for overnight fermentation (at least 6hours) in a warm place. By morning, the batter will be doubled in volume. Stir in salt and baking powder. Consistency of batter must be medium (like condensed milk), not too tight or too watery. Add water if necessary.

Idli plates filled with rice-lentil batter just before cooking Steamed idlies just out of the vessel
Idly plates filled with rice ravva-urad dal batter all ready for steam cooking***Idlies after steam cooking

In a big vessel (fit to idly stand) with tight lid, add about half to one glass of water and bring to a boil.

Separate the plates in idly stand; pour spoonfuls of batter in round impressions (see the photo above). Fill all the plates with idly batter and place these filled idly plates, back on the stand. Place this idly stand with filled plates in the vessel with boiling water. Cover it tightly and cook them on steam. The plates are perforated and allow the idlis to be steam-cooked evenly.

After about 15 to 20 minutes, the batter will be hardened and when touched, won’t stick to your fingers like a wet batter does. Turn off the heat and remove the idly stand from the vessel. Run a spoon under each impression to separate steamed idlies from the plate. Remove them all like this and get ready to steam the next batch of idlis.

Serve idlis piping hot with sambhar, coconut chutney and idly karam podi ~ for a traditional, proper south Indian breakfast.

Idlies with coconut chutney, idli karam podi and shallot sambhar
Idlis with coconut chutney, idli karam podi and shallot sambhar ~ Our weekend brunch

double_curve.gif

Answering questions about my Idly routine:

I usually prepare idlis for our weekend brunch. My prep work for Saturday’s brunch of idli starts like this. I soak the urad dal on Friday morning, around 7-9 AM. It takes at least 4 to 6 hours for them to soften. Around 6-8 PM evening, I grind them into smooth, silky smooth batter. I remove the batter into a big vessel and mix up with store bought idli rava. Then I keep it covered overnight for fermentation. By morning, the batter will be fermented and changed in looks and consistency. After stirring in salt and little bit of baking powder, I pour ladleful of batter into the impressions on idly plates and steam cook them.

The tips I follow:
1. I use round urad dal(whole and white). Somehow they are better than the broken ones for idlis.
2. I soak the urad dal in just enough water and while grinding I add this drained water. This tip works only in cold climate to aid the fermentation.
3. While grinding I also add one or two teaspoons of soaked fenugreek seeds. This is an old tip, to improve the taste and fermentation.
4. Urad dal batter- the smooth the batter, the fluffy and silky, the idlis will be. Grind, grind and grind, run that blender motor until it gets hot.:)
4. Rice ravva- I use store bought kind.
5. Fermentation- I set the oven on to minimum (lowest setting/warm) for about 5 minutes, then I’ll turn it off. By the time I’m ready with batter, the oven will be warm. During bitter cold wintertime, keeping the batter in this cozy, warm oven aids fermentation process.
6. In the morning, I usually add a pinch of baking powder to the batter (old time tip).
For more tips, check out this wiki article on Idlis.

Recipe source: Amma

Posted by Indira©Copyrighted in Amma & Authentic Andhra,Rice Ravva (Cream of Rice),Urad Dal (Washed) (Tuesday February 21, 2006 at 4:50 pm- permalink)
Comments (119)

The New Home of Mahanandi: www.themahanandi.org

Sambhar with Shallots (Baby Onions)

Last week I purchased one packet of shallots (baby onions). With them, I prepared a south Indian special ‘shallot sambhar’ i.e. tiny, baby onions are first peeled out of their dry skin/coverings, then cooked as whole, in thick lentil (toor dal) soup. Tasty and delightful! Like all babies, they are tiny bundles of joy, a gastronomic kind:) and worth the high price.

 Shallot(Baby onion) Sambhar, Toor dal
Shallot Sambhar – Light and refreshing

Recipe:

My sambhar cooking routine is a three-step process.

1. Pressure-cook the toor dal until soft, so that it can be mashed/pureed into smooth paste. Soak the tamarind in water to extract the juice.

2. In the meantime, cut and cook vegetables for sambhar- usually tomatoes and vegetables (shallots). The process I follow is like this. Heat one teaspoon of oil a big saucepan, add and toast popu ingredients. To it, I’ll add chopped tomatoes and cook them until they turn soft and mushy. Then I’ll add and cook shallots (or vegetables), one cup of water and also the seasoning (sambhar powder, turmeric, red chilli powder and salt).

3. Simmering 1 and 2 together- To the cooked tomato-shallot mixture, add the mashed toor dal paste and tamarind juice. Stirring in between, let simmer for about 15 to 30 minutes. Just before turning off the heat, garnish with finely chopped cilantro and serve.

Ingredients:
4 fistfuls of toor dal (3/4 cup)
12 to 15 shallots (baby onions)
2 ripe juicy tomatoes
Seasoning:
1 tablespoon of tamarind juice
1 tsp of sambhar powder
1/2 tsp of red chilli powder and salt
1/4 tsp of turmeric
Cilantro for garnish
Popu or tadka:
1 tsp each of mustard seeds, cumin, urad dal, curry leaves, minced garlic. Also few curry leaves and dried red chilli pieces
Variation
I prepared this sambhar for idlies and for idly sambhar, I usually add half tsp of cloves & cinnamon powder, to spice up the sambhar a little bit.

Mashed Toor dal, Tamarind juice, tomatoes, shallots (Baby onions), cloves and cinnamon
Ingredients for shallot sambhar

For more detailed sambhar recipe (like how to prepare home made sambhar powder etc.,), check out my other blogged recipes- Okra Sambhar and white radish sambhar.

Posted by Indira©Copyrighted in Amma & Authentic Andhra,Onions,Shallots,Toor Dal (Monday February 20, 2006 at 3:28 pm- permalink)
Comments (19)

The New Home of Mahanandi: www.themahanandi.org

Coconut Chutney (Kobbari Pacchadi)

Coconut chutney is an example of how good a raw food can taste when prepared with right ingredients. Whoever came up with this recipe, my salute to them! People remember and replicate a good recipe; no wonder, this age old recipe continues to be popular and beloved by all who tried it.

Breakfast is not a proper breakfast without coconut chutney in Southern states of India (Andhra, Tamilnadu, Karnataka and Kerala). Perfect blend of different flavors and the ease with which it can be made – coconut chutney is a great example of traditional, health conscious South Indian food and a showcase recipe for raw cuisine. See the photo below, if you find coconut chutney looking similar in an Indian restaurant along with your dosas, idlies, that’s a sure sign that you are getting a proper south Indian food.

Fresh Coconut, Cilantro, Red onion, Ginger, Dalia(pappulu) and green chillies

Recipe:

1 cup of thinly sliced fresh coconut
¼ cup of pappulu(dalia, roasted chickpeas)
6 Indian small green chillies, chopped
1 tiny red onion or shallot, sliced into chunks
6 sprigs of fresh cilantro and 1/2 inch of ginger
½ tablespoon of tamarind extract
¼ tsp of salt
for popu or tadka
1 tsp each of mustard seeds, cumin, urad dal, fresh curry leaves and few pieces of dried red chilli.
extras(optional)
1 tablespoon of yogurt and one lime

Tadka/popu is done and ready to add to the coconut chutney Final step- adding the tadka/popu to coconut chutney

Preparation:
Preparation means grinding. Taste of coconut chutney varies with grinding method. Believe it or not, different grinding tools give different taste. The best taste comes out of using a stone mortar. Closest is the machine, which grinds with a stone. Last is the food processor or the blender etc., The taste is inversely proportionate to how easily you can grind it.

In a mortar or blender, combine all the ingredients (coconut, pappulu, onion, green chillies, cilantro, ginger, tamarind extract and salt). Add half to one cup of water and grind them until the ingredients are pureed. Transfer the mixture to a cup.

In a small pan, add half teaspoon of peanut oil, add the popu ingredients, sauté them until they start to splutter. Remove the pan from heat and add this popu to the pureed coconut mixture in the cup. Stir in little bit of yogurt now (our family variation). The chutney is ready. Just before serving, squeeze few drops of limejuice.

Traditionally coconut chutney is served with dosa, idly, vada, upma, utappam, pesarattu and pongal, as a part of morning breakfast.

Coconut chutney with popu/tadka just added
Coconut Chutney ~ South Indian Style

Note to reader: I use, tiny red onion or shallot (Indian onion, small baby onion) for this chutney. Either one is preferable than white/yellow onions (US). Red onion/shallots are less harsh in flavor when raw and don’t overpower the chutney with their bitterness.

Recipe source: Family- Amma & Attamma(mother and mil)
For several variations of this recipe, read the comments.

Posted by Indira©Copyrighted in Amma & Authentic Andhra,Chana Dal-Roasted (Dalia),Coconut (Fresh) (Thursday February 16, 2006 at 8:13 pm- permalink)
Comments (54)

The New Home of Mahanandi: www.themahanandi.org

Kadala Curry/Ghughni (Black Chickpeas&Coconut Milk)

Black chickpeas are another type of legume, which I frequently add to the regular sauté curries. Compared to white chickpeas, black ones – we call them ‘kaala chana’, like all other colored ingredients, have an earthy taste and a more robust nutty flavor. They not only bring color to the dish and also fill that essential, guilt free protein need. They are the wonder food, that taste good.

Raw black chickpeas, Soaked overnight in water-black chickpeas, Pressure cooked black chickpeas
Black Chickpeas – Raw, Soaked in water and Pressure-cooked

I learned by reading other food bloggers recipes that, black chickpeas cooked in coconut milk based sauce is Keralas favorite dish – ‘The Kadala Curry’. Cooked in tomato-onion sauce without the coconut is Bengalis favorite dish – ‘The Ghughni’. Last weekend I prepared – ‘Kadala curry’ with coconut milk.

Recipe:

1 cup black chickpeas, overnight soaked in water
Sauce:
½ cup coconut milk (homemade watery kind)
4 medium sized ripe tomatoes,
1 medium sized red onion or 4 to 6 shallots
Seasoning:
1 tsp of g-g-c paste (Ginger-Garlic-Cilantro)
1 tsp of c-c-c-c powder(Cumin-Coriander seed-Cloves-Cinnamon)
½ tsp of red chilli powder and turmeric
Salt to taste
Popu(tadka)
1 tsp of each, mustard seeds, cumin, minced garlic and curry leaves

1. Take black chickpeas in a pressure cooker, add ¼ tsp of salt and 2 cups of water. Pressure-cook them till they are just tender. (Take caution not overcook them.) Drain and keep aside.
2. Meanwhile – roast tomatoes and onions in half teaspoon of oil. When they are little bit cool, grind them to smooth paste. Also prepare coconut milk and g-g-g paste and c-c-c-c powder.
3. Cook 1 and 2 together. In a big sauce pan, heat 1 teaspoon of oil, toast popu or tadka ingredients, add the sauce and seasonings and half cup of water. Cover and cook them for about 10 minutes. Stir in black chickpeas and coconut milk and simmer them, stirring in between until the curry reaches the thickness you desire or for about 10-15 minutes on medium heat.
Serve hot with roti/nan or with rice.

Variation: If you are calorie conscious, you can make this curry without coconut milk. Just increase the amount of tomatoes and onions for sauce – you’ve prepared a traditional Bengali dish ‘Ghughni‘.

Kadala Curry and Roti

Recipe Source: Priya’s Kitchen and Kadchi Ki Kamal.
For Ghughni and its different variations try Google search.

Posted by Indira©Copyrighted in Chickpeas-Black,Coconut (Fresh) (Tuesday February 14, 2006 at 9:56 am- permalink)
Comments (17)

The New Home of Mahanandi: www.themahanandi.org

Ridge Gourd Dal (Beerakaya Pappu)

Everyone has their own food weaknesses. Mine has always been rice and dal. I loose my dietary control over this combination. I am a dal-holic.:) So, what did I do with ridge gourd purchased from ‘Lotus’ yesterday, I have ridge gourd dal. Simple yet divinely tasty when mixed with rice and ghee. Today, no portion control for me.

Ridge Gourd (Beera Kaya, Turai) Pressure Cooked Ridge Gourd and Toor Dal Mixture
Ridge Gourd – In bite sized pieces………….. ……………Presssure-cooked toor dal and vegetable mixture

Recipe:
for two for two meals

Toor dal – 4 fistfuls (¾ cup)
Vegetables:
One medium sized ridge gourd
outer ridges peeled first and then cut into small cubes
One medium sized onion & 6 to 10 green chilli peppers –all finely chopped
Seasoning:
1 tablespoon of tamarind extract
¼ tsp of turmeric
½ tsp of salt
For popu or tadka: 1 tsp each of mustard seeds, cumin, urad dal, minced garlic and curry leaves

Take toor dal, vegetables (listed above), tamarind and turmeric in a pressure cooker. Add about two cups of water. Pressure-cook them til 3 whistles or until they turn soft. Wait until it’s safe to open the lid, then add salt to this cooked mix. With a wood masher, make a smooth paste of the cooked dal-veggies. At this stage, for a more soup kind of dal, add water to your liking, stir and bring it to a boil. (Do this step only if you add more water to the cooked-mashed dal. Otherwise it’s not necessary to cook the dal further.)

In a steel vessel, heat one teaspoon of peanut oil. Sauté the popu or tadka ingredients until golden, then add the mashed dal-veggie paste from the cooker. Mix the dal with popu ingredients thoroughly. Serve hot with rice and ghee.

Ridge Gourd Dal with rice and curry

Ridge gourd dal and curry with rice and ghee – my weakness and indulgence.

Posted by Indira©Copyrighted in Amma & Authentic Andhra,Beera kaaya(Ridge Gourd),Toor Dal (Thursday February 9, 2006 at 2:36 pm- permalink)
Comments (23)

The New Home of Mahanandi: www.themahanandi.org

Red, Yellow and Green – Bell Pepper Curry

Eye catching and good looking, the 3 bell pepper curry is a flavorful, quick side dish to make.

1.Take one each of red, yellow and green bell peppers, cut each one into half. Remove the seeds inside and slice them thin lengthwise.

2.Heat one teaspoon of peanut oil in a wide pan. Toast pinch of each mustard seeds, cumin, minced garlic (popu).

3.Add and cook bell peppers, covered for about 5 minutes on medium-low.

4.Remove the lid; add pinch of turmeric, a tablespoon of spicy dalia powder (pappula podi) and salt to taste. Cook/saute them for another 5 minutes openly, on high heat, stirring often.

Serve hot with rice and dal or with chapatis.

Celebrating Steelers Superbowl Sunday with 3 Bell pepper curry.

Posted by Indira©Copyrighted in Bell Pepper,Chana Dal-Roasted (Dalia) (Friday February 3, 2006 at 2:29 pm- permalink)
Comments (15)

The New Home of Mahanandi: www.themahanandi.org

« Next PagePrevious Page »