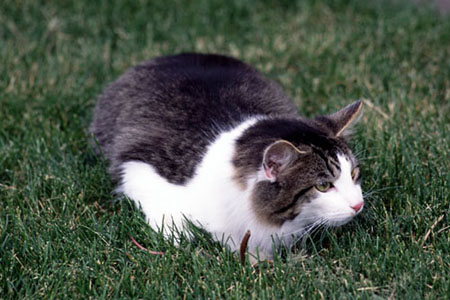
Kittaya enjoying the evening on the deck.

Also see many faces of Kiri– the beautiful burmese cat at Clare’s blog.
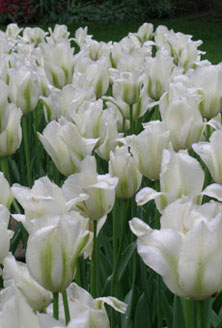
Tulips in full bloom at Mill Creek Metro parks.

Kittaya enjoying the evening on the deck.
Also see many faces of Kiri– the beautiful burmese cat at Clare’s blog.
Tulips in full bloom at Mill Creek Metro parks.
Stephanie’s beautiful fruit tart inspired me to make one myself. Also I saw this month’s SHF theme was tarts and that gave me the final push I needed.
I used a store bought lard-free pie shell as base for fruits. Did I say that this was my first time making tart, may be next time I might make my own tart shell. For now, this will do. For filling, I went with toasted walnuts and fresh fruits – ripe mango, strawberries, plums, cherries and cantaloupe.
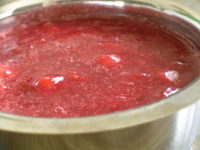
Baked the pie shell in the oven for 15 minutes as per instructions on the cover of the pie shell package. Meanwhile I started to cut the ripe fruits in different shapes needed for my tart. With all the remaining scraps of fruit, I made jam/jelly, just like that. I added 6 tablespoons of brown sugar and watched the fruit bits turn into bright, colorful mush on high heat. I let it cool, stored half of it as jam and to the remaining half, I added half a cup of toasted walnuts and pureed them together to a smooth paste. This was my tart filler.
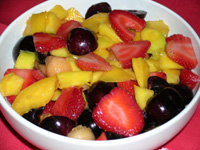
After filling the tart shell with the fruit-walnut puree, I arranged cut mangos, strawberries, plums, cherries and cantaloupe in order and refrigerated the tart for about one hour. Ta da… check the photo of fruit tart below, isn’t it colorful and pretty?
What a quick and easy recipe, but it gives the impression as if it took hours to prepare. We shared this delicious fruit tart with our next-door neighbor to congratulate on her new job.
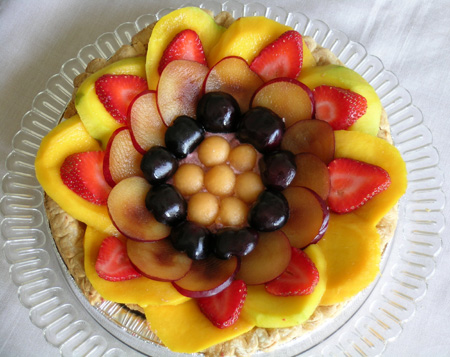
My maiden attempt at fruit tart was a delightful success. I will definitely make many more.
First time tagged, that too, by the sorceress who utilizes her powers only for good deeds – the benevolent Stephanie.
1. Total number of cook/food books I’ve owned:
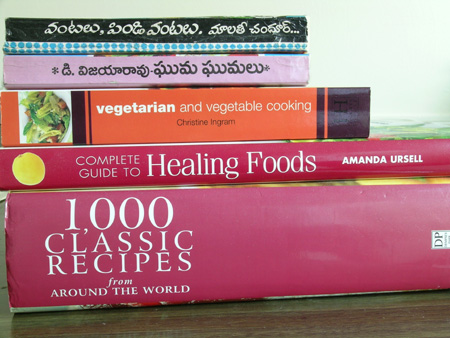
That’s all I have and that’s enough for me, for now.
I rarely buy hobby books nowadays, mainly because it’s becoming a big hassle for us to carry them whenever we move places. We both already have a big collection of books related to our professions. There is always a library nearby and plenty of books to flick through.
2. Last cook/food book(s) I bought:
That would be the Vegetarian and Vegetable Cooking by Christine Ingram.
3. Last cook/food book I read:
That would be The Man Who Ate Everything by Jeffrey L. Steingarten. Just last weekend, finished reading and returned it to the library.
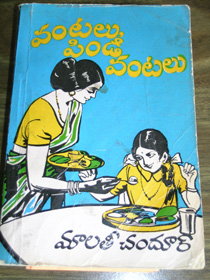
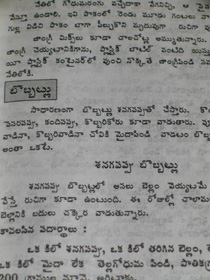
4. Five cook books (or one) that mean a lot to me:
Malathi Chandur’s cookbook in Telugu is the one most valuable to me. Because it was my first buy and the author’s old world charming writing style is so entertaining and her recipes are pure gold.
5. Which five people would you most like to see fill this out in their blog?
(Isn’t this cookbook meme going around for past two months?)
I am going to tag the always and forever a foodie, Shyam (aka Shammy) of Food In The Main.
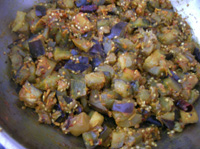
Eggplant- different names and its culinary journey through different cultures is quite interesting. Whatever you do with this vegetable, it always comes out as a winner in the taste department. It’s the only vegetable who has songs written about it (praising the taste) in my native language Telugu. Even though what’s available here is different in shape and taste from that of, my home place, I still cook it the same way and it tastes great.
Eggplant Curry:
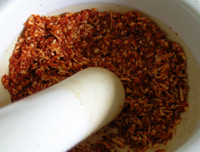
First, make a powder of 3 red chillies, one garlic clove, small piece of ginger, 2 tsps of dry coconut and 1/2 tsp of salt.
Next, wash the eggplant thoroughly to lose the wax coating. Pat it dry and cut it into small cubes. In a pan, add 1 tsp of oil, when it is hot, do the popu (frying cumin, mustard seeds and curry leaves). Now add the eggplant cubes, toss them a few times, then spread them evenly in the pan. Reduce the heat; let them cook for few minutes. Sprinkle a pinch of turmeric, half tsp of salt and the red chilli powder prepared earlier, toss them again. On low heat, cook them for few more minutes. Switch off the heat before they turn into big shapeless mush.

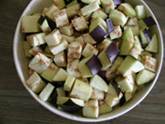
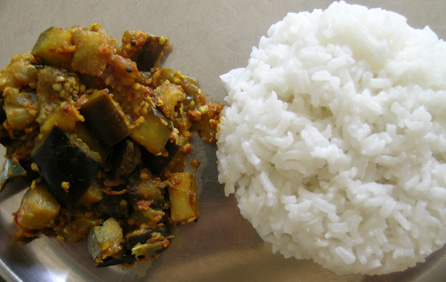
Served with rice and ghee, a cup of yogurt on the side – one satisfying meal.
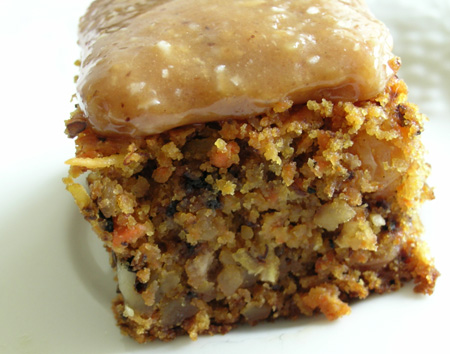
Carrots and bananas – what happens when you put the two together, you get a deliciously rich and different dessert that’s the best of both. The recipe is my own – out with the pineapple, cloves, all-spice and eggs – in goes the bananas and cardamom. They give the cake a wonderful, fruity, honeyed fragrance. The recipe is somewhat different but tastes as good, I might say, even better than the traditional carrot cake.
Recipe: 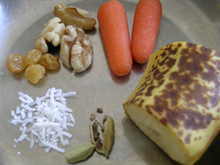
2 cups of Betty Crocker pancake flour
2 cups of grated carrots
1 cup finely chopped walnuts
1/2 cup dry unsweetened coconut flakes
1/2 cup golden raisins
1 tsp of baking soda
Mix all of the above in a big bowl.
5 cardamom pods- peel and powder the seeds inside
2 big ripe bananas- peel, mash and beat until fluffy
1/2 cup oil
1/2 cup to 1 cup of brown sugar- (your wish)
In another big bowl, mix them well.
I used the pancake flour only because I want to finish off the BIG packet, purchased at Costco last winter. You can always substitute that with all-purpose flour. You can purchase dry unsweetened coconut, golden raisins and cardamom at low prices in an Indian grocery shop.
Now back to cake making – Preheat the oven to 350 F. Meanwhile fold the wet ingredients into dry ingredients, mixing thoroughly but not hard. Add some milk and combine again if the batter is too tight. Pour this mixture into a big round buttered cake pan. Bake the cake at 350 F, for about 30 to 45 minutes or until a toothpick inserted into the center of the cake comes out clean. Cool it before applying frosting or decorating. The topping on the carrot cake is walnut-coconut caramel (see the post below for the recipe)
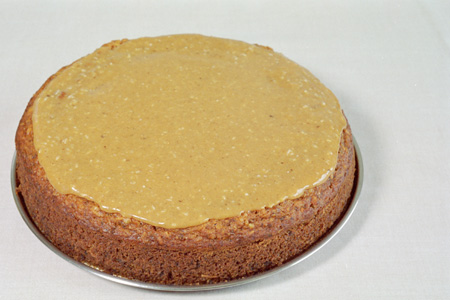
Comparable to an Indian version of carrot sweet called carrot halwa, this carrot cake is simply moist, rich and delicious.
This weekend, I prepared a carrot cake and walnut-coconut caramel for weekend barbecue party at our friend’s house. Last month, they added a big deck to their house and also bought a new gas grill. It is a sort of opening party for the new deck and grill.
I initially started making the carrot cake, then I remembered my pregnant friend who had just passed very difficult first 3 months, when she couldn’t eat anything because of high case of nausea. I thought walnut-coconut toffee is the best in-between meals snack for her now. Just like that, I made the caramel toffee. I also used some of it as topping or dressing for the carrot cake. The cake was a big hit with the children. They loved it and one curious kid asked me why I made the caramel instead of cream cheese topping. I Knew caramel is unusual topping for carrot cake and told him that I was just trying something different. He told me that he loved caramel and he served himself a big piece. 🙂
Walnut-Coconut Caramel Toffee: 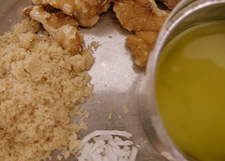
Preparation:
Combine ghee, brown sugar and evaporated milk in a thick-bottomed vessel. Cook them stirring occasionally until they reach the softball stage. Now add walnuts and coconut flakes, stir them until well coated or for about 2 to 3 minutes. Pour them into a greased flat dish, refrigerate until set. Cut into small squares and wrap them individually in wax paper.
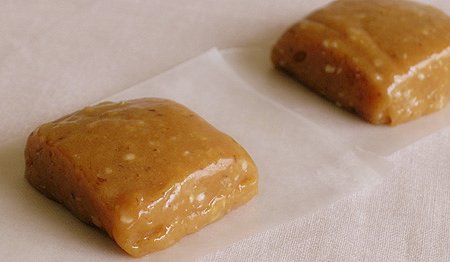
I can never make this type of sweet for us. We don’t do enough work to spend the extra calories. But for a special friend in her special condition- they are prefect treats.
I like dosas of all kinds, when Mika posted a dosa recipe with sprouted moong dal, I knew I had to try it. At least once a month, I do the whole, three day, moong dal sprouting thing – meaning- soaking moong dal overnight in water, next morning draining the water from the soaked moong dal and hanging them in a wet cheesecloth (aka-clean cotton cloth with tiny wholes) by the kitchen window. Because of hot weather these days, the moong dal loses the moisture quickly so you have to wet the cloth frequently. By the next day, there you have it- sprouted moong dal. What’s more beautiful than sprouted beans, with their tiny white sprouts protruding.
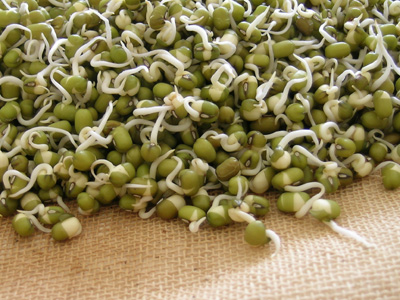
Most of the times, we saute them lightly, sprinkle some salt, instead of popcorn etc., we munch on them. Sometimes we do the whole onion, coconut, green chilli,
I mostly followed Mika’s recipe, grinded the sprouts adding ginger, chillies and salt. Then, to grinded mixture I also added cumin seeds, half cup of water, finely chopped onions and cilantro. Mixed all the ingredients thoroughly and prepared the dosas. They are more like utappam version of pesarattus, thicker and more tastier because I used sprouted moong dal.
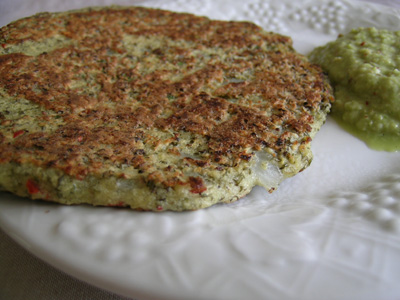
Served with coconut-cilantro chutney, we couldn’t get enough of them. These gave us great satisfying taste with minimal effort. Thanks to Mika for a great recipe.
Coconut, saffron and ghee- the auspicious things in my cooking world, by adding the cashews, cardamom, golden raisins, sugar and sabudana, cooking them together, I just made a classic, delicious Indian sweet. Traditionally, it is prepared in liquid form (payasam), but I wanted to try something new and made it in pudding form. This light and luscious, very easy to prepare dessert is perfect on warm humid days like the ones we are having this past week.
Recipe: 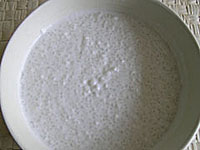
Preparation:
In a big saucepan, empty the soaked sabudana along with coconut milk, add another half cup of water or milk and sugar. Combine and cook them on medium heat, stirring to prevent the formation of the lumps until the sabudana turn translucent. Reduce the heat, add and stir – ghee, cashews, golden raisins, saffron water and cardamom powder. Let it simmer until the whole thing reaches the consistency of thick flowing magma. Turn off the heat, pour the mixture into jello molds or small cups and freeze them for 1 to 2 hours. The pudding can be removed from the cups by easing the sides off with a knife.
Serve them in different sweet sauces, your choice. I pureed ripe mango without adding sugar, added it as sauce to the pudding.
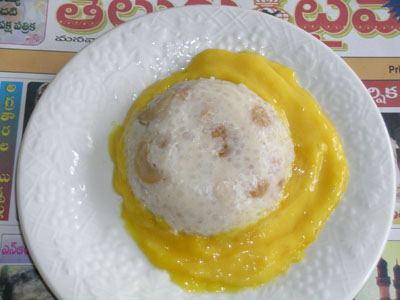
Sabudana (Sago) Pudding in Sweet Mango Sauce
Welcome to my new domain!
I’m very happy that I bought my own domain, a web real estate for “Mahanandi”. I’m in the process of moving the posts from www.mahanandi.blogspot.com (Blogger Site) to this new place.
www. atsutorials.catsudon.org/?p=15 – This site helped me to transfer the content and comments from blogger to wordpress (from my old site to this new site).
Photos – I did myself.
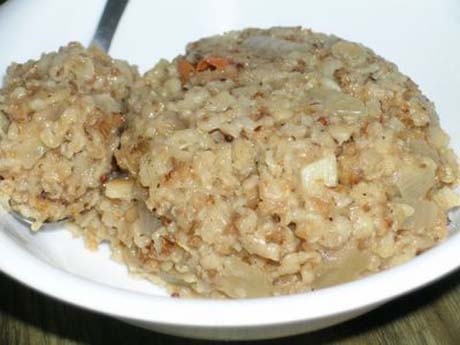
I love my spicy version of oatmeal. Just by adding the traditional Indian ingredients of upma, the bland oatmeal transforms into a spicy, feed me more, kind of mush. Add pickle or podi, you won’t believe how good it tastes.
Recipe:
Dry roast oats (I usually buy Quaker brand – old fashioned oats) in an iron skillet, until they leave their white color, for few minutes.
Finely chop one small onion, three green chillies, one garlic clove and 10 paisa size ginger.
Add one tsp of oil or ghee to a hot pan, do the popu or tiragmata, then add the finely chopped vegetables, saute to soft for few minutes.
For one cup of oats – add two cups of water and quarter teaspoon of salt. Close the lid and on high heat, bring the water to dancing stage (boil).
Now remove the lid and add oats, stirring continuously. Reduce the heat, let the oats cook, covered for about 5 to 8 minutes or until the oats absorb all the water. If you want, you can also add roasted peanuts or cashews at this stage, to make it more wholesome.
Serve the oatmeal upma warm. Best combination is Oatmeal upma and spicy dhalia powder (pappula podi).
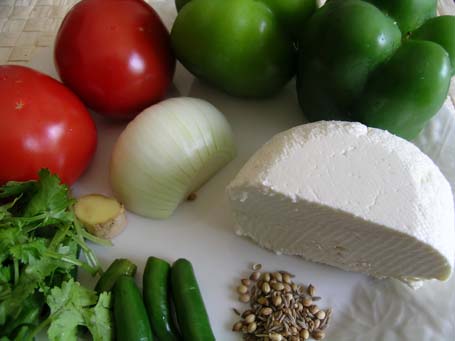
I prepared a big block of paneer this weekend. Half of it went into the palak paneer and with the remaining half, I prepared this tasty kadai paneer, today.
Ingredients:
Three ripe juicy tomatoes, 4 bell peppers, small onion – all cut into small pieces
Half tsp of ginger- garlic-cilantro paste
Cumin-coriander powder, salt and red chilli powder~ each half tsp or as per your taste
10 to 15 paneer cubes.
Preparation:
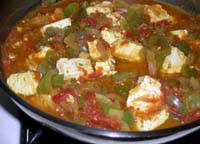
Just like the regular curry, first fry the onions in 1 tsp of oil, then add g-g-c paste and c-c powder, sauté them little bit, then add salt, red chilly powder, tomatoes and bell peppers. Cook them for few minutes until the gravy (juice from tomatoes) thickens, then add paneer cubes. Simmer them for few more minutes in the gravy.
Kadai paneer and chapati- that’s one good and filling combination
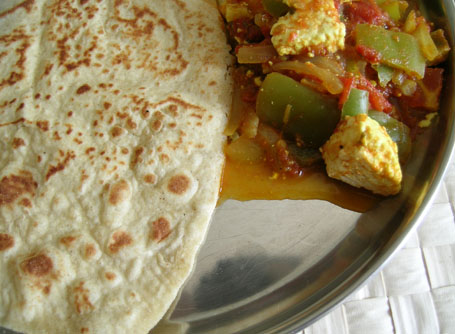
You can always substitute paneer with very firm tofu. I often make paneer curries with tofu. Different taste, but after knowing how they obtain milk here, I cautiously use milk and its products.
Who is more entertaining – NY Times restaurant critic or The Bruni Digest.
Exploring the standard Indian buffet – The best review I have read so far.
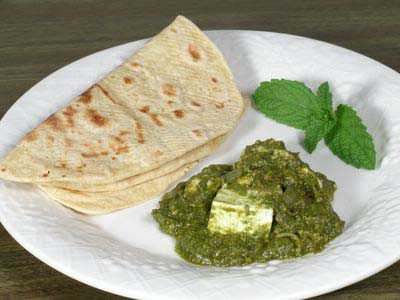
I learned the organized approach to cooking North Indian dishes from Deviji, a kind Punjabi lady, our neighbor in Pittsburgh, when we were living there. She taught me how to cook my favorites, she insisted that I come and see how she prepares in her kitchen so that I won’t forget. She used to say if you see, you won’t forget, particularly cooking. I think that is true. My entire north Indian cooking is her recipes including the paneer post below. Hope you try them and enjoy as much as we do. Here is one…The famous palak paneer
Recipe:
One big bunch of spinach (fresh green ones)
Paneer ~10 to 15 cubes
One medium sized ripe tomato
Green chillies 5, half onion~ chopped finely into small pieces
Half tsp of garlic-ginger-cilantro paste
One tsp of dhania-jeera (coriander-cumin) powder
Quarter cup cashews
Half tsp of salt
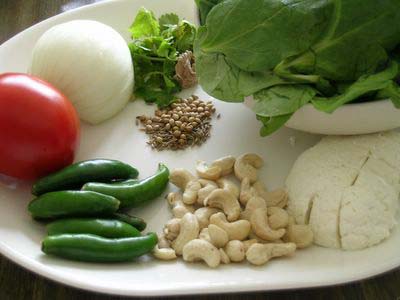
Preparation:
Spinach and Green Chillies – Wash the spinach, cut or tear them into big pieces. Heat a teaspoon of oil in a wide skillet. First add green chillies to hot oil, then spinach. Saute until the leaves are wilted. Turn off the heat. Wait few minutes to cool. Add them to a blender and also a pinch of salt – blend to smooth paste. Adding green chillies to spinach puree is very important step; it gives punch to bland spinach.
Tomato- Boil tomato in hot water till the skin break down, remove the skin, mash the tomato to a pulp.
Cashews- Roast cashews lightly, make fine powder of them.
Paneer- Lightly saute paneer cubes in one teaspoon of ghee till they are golden brown. (This is optional, you can add paneer cubes just as they are.)
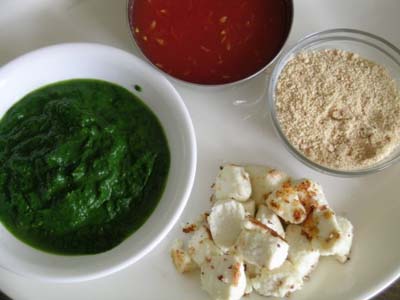
Now with the curry:
Add one teaspoon of ghee or oil to a wide skillet. When it is hot, fry the onions till translucent. Add ginger-garlic-cilantro paste and dhania-jeera powder, mix them and saute for 2 to 3 minutes.
Now add pureed spinach, tomato and cashew powder along with a pinch of turmeric and salt to taste. Mix thoroughly and add water if needed. Do not dilute the curry too much. It should not spread like flooding river when served on a plate.
Cook it covered on low flame for about 5 to 10 minutes. Just before turning off the heat, add the paneer cubes. Mix them with the spinach (palak). Let simmer for 2 or 3 minutes and then turn off the heat.
Serve the curry hot with chapatis (rotis) or with rice. Also for novelty, you can make a Palak Panner Naanini (Split naan into two layers, apply generous potions of palak paneer in-between. Grill or Oven-broil for few minutes and serve with yogurt raita.) Anyway you prefer, palak paneer is truly a guilt free, satisfying, well balanced delicious dish.
What you need: 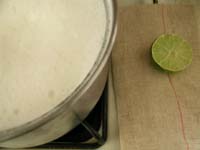
Whole Milk – half gallon
Juice from one lime, about 2 to 3 tbs
Muslin cloth (gangi gudda)
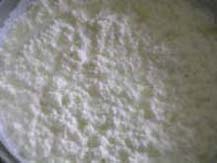
Boil the milk in a thick-bottomed vessel on medium heat, stirring occasionally (sometimes milk stick to the bottom and burns, so take caution). Once the milk starts to boil, reduce the heat and add the limejuice, stirring continuously.
In few minutes, you see small curds like white clouds floating on top. Wait till they get bigger (if they don’t, add some more lime juice and stir) and the whey below gets less milky. This process takes few minutes, so wait at least five minutes. Switch off the heat and let it stand for few more minutes. Then pour the whole thing immediately into a clean muslin or cheese cloth in a sieve, over a sink. Gather the curds and discard the whey.
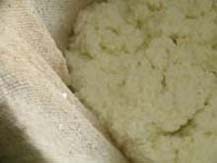
Keep the curds in the cloth, tie a knot much above their level and hang it over a kitchen sink. Let the whey drip for half an hour. Now remove the knot, twist the cloth several times to make it tighten, squeeze out any remaining whey, make a tight knot just above the paneer, shaping the paneer into a round ball. Keep it hanging for another 30 minutes.
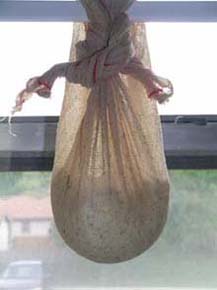
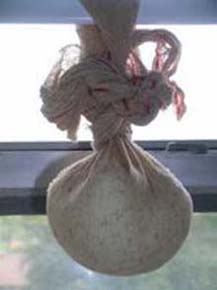
Remove the paneer from the cloth. Now with the all the whey gone, it turns out into a firm ball. Store this in the refrigerator, 2 to 3 hours, for further solidification. After that, you can use the delightful paneer in curries or just plain fried, as you wish.

Try it, if you have not already, this easy to make, pure, rennet free, Paneer~ the Indian cheese.
Paneer Recipes I have blogged so far on Mahanandi:
Palak Paneer ~ Paneer with Spinach
Pudina Paneer ~ Paneer with Fresh Mint
Paneer Jalfrezi ~ Paneer with Green Bell Pepper and Tomato
Kadhi Paneer ~ Paneer with Spicy Yogurt Based Sauce
Matar Paneer ~ Paneer with Fresh Peas of Summer
Hare Chane Paneer ~ Paneer with Fresh Green Garbanzo/Chickpeas
Sarson da Saag ~ Paneer with Baby Mustard Greens and Spinach
Paneer Pad Thai with Bok Choy
Paneer Naanini ~ Naan stuffed with crumbled paneer & spinach curry

| M | T | W | T | F | S | S |
|---|---|---|---|---|---|---|
| 1 | ||||||
| 2 | 3 | 4 | 5 | 6 | 7 | 8 |
| 9 | 10 | 11 | 12 | 13 | 14 | 15 |
| 16 | 17 | 18 | 19 | 20 | 21 | 22 |
| 23 | 24 | 25 | 26 | 27 | 28 | 29 |
| 30 | 31 | |||||
